Managing web connectors
PERMISSIONS Admin access to the QuickBooks data file and security level with permission to configure the QuickBooks Extension. Refer to Admin security settings.
NAVIGATION Left Navigation Menu > Admin > Admin Categories > Extensions & Integrations > QuickBooks Extension > Web Connectors
NOTE To learn everything about the QuickBooks Extension for Desktop, refer to the landing page for documentation links, configuration steps, videos, and walk-throughs that help you set it up.
About web connectors
QuickBooks Web Connector (QBWC) is a Microsoft Windows application that enables web-based applications such as Autotask to exchange data with a specific QuickBooks Desktop data file. You download this application from an Intuit website and install it on the same PC, server, or VM as the QuickBooks desktop application. It allows you to set up communications between QuickBooks desktop and cloud-based applications such as Autotask.
The file that manages the connection between an Autotask instance and a QuickBooks company file is called a web connector.
Each web connector is configured to communicate with only one QuickBooks company file. Most customers will only transfer data to one QuickBooks company file. Therefore, they will need to configure only one web connector. Some customers will need to transfer data from one Autotask instance to multiple QuickBooks company files (this is not common), and will need to set up multiple web connectors. Refer to Customer implementation scenarios.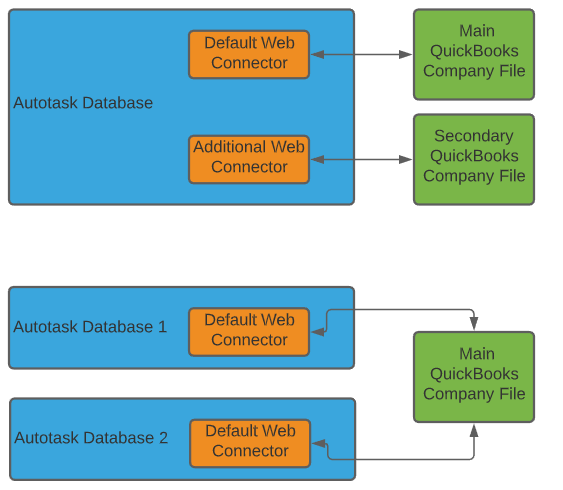
IMPORTANT Do not set up multiple web connectors if you have only a single QuickBooks company file! The relationship between a web connector in Autotask and a QuickBooks database is always one-to-one.
The integration supports the posting of up to 10 MB of data.
Connecting to multiple QuickBooks data files
Most of our partners who use the QuickBooks integration use only one QuickBooks company file, but the QBWC integration also supports data transfers from one Autotask instance to multiple QuickBooks company files. Since each web connector defines the link to a single QuickBooks company file, you must create additional web connectors. You will be able to do the following:
- Create multiple web connector files. Only customers who use multiple company files will need more than one web connector. Refer to Adding or editing a single or first web connector.
- Associate each web connector with a different QuickBooks company file. The QuickBooks Extension (New) does not support linking multiple web connectors from one Autotask instance to a single QuickBooks data file.
- Map all organizations in Autotask that will not be associated with the default web connector (and therefore your main QuickBooks company file) to one of the additional web connectors. This is not common. Refer to Mapping an Autotask organization to a different web connector.
NOTE The first web connector you configure will be the default one, and all organizations in your Autotask instance are automatically mapped to the default web connector. You can manually map individual organizations to a different web connector, but since you cannot change the default connector or delete a web connector, it is vitally important that you set up your default connector first!
Configuring multiple users
You can also configure the integration to support data transfers by multiple QuickBooks users. Refer to Configuring the integration for multiple users.
Adding a web connector
BEFORE YOU BEGIN Refer to MUST READ: Autotask and QuickBooks requirements.
To configure a web connector, click New. Refer to Adding or editing a single or first web connector.
Grid Columns
| Column Header | Description |
|---|---|
| Name | The name you gave the web connector on the New web connector page or the Edit web connector page. |
| Default | Selected if this web connector is the default one. The first web connector you set up will be the default web connector, and the default cannot be changed. |
| Invoice Transfer Enabled | Selected if Transfer Invoices & Sync Paid Date is enabled for this web connector. |
|
Transfer Invoices |
Selected if Invoice Transfer & Paid Date Sync is enabled for this web connector. |
|
Transfer Timesheets |
Selected if Transfer Timesheet is enabled for this web connector. |
|
Transfer Expense Reports |
Selected if Transfer Expense Reports is enabled for this web connector. |
|
Transfer Purchase Orders |
Selected if Transfer Purchase Orders & Sync Inventory (from transferred Purchase Orders) is enabled for this web connector. |
| Last Sync |
This column will show the status of the last conversation. It will be one of the following:
|
| Last Sync Status | The date and time of the last sync attempt. |
| Status (Last 10) |
This column provides a visual indication of the success of the 10 last conversations. A conversation is a discrete communication attempt between QuickBooks and Autotask managed by this web connector. Each conversation is represented by a dot:
A successful conversation does not mean that all invoices were transferred. |
 Conversation was successful, that is, did not generate an error message.
Why conversations error or fail
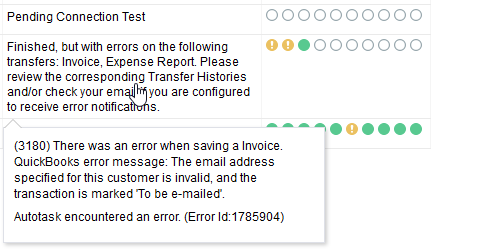
When you see the error or failure
 icons in the Status (Last 10) column, it means that the web connector was unable to establish a conversation at all, or there were issues with the transfer. This could happen for the following reasons:
- In Progress - The conversation is not complete.
- Success, but there are configuration issues that need attention. Please review your Web Connector's log files and/or check your email if you are configured to receive error notifications.
- Finished, but with errors on the following transfers: Invoice, Timesheet, Expense Report, Purchase Order, Inventory Sync. Please review the corresponding Transfer History/Histories and/or check your email if you are configured to receive error notifications.
- Unsuccessful - Could not communicate with QuickBooks. Please review your Web Connector's log files and/or check your email if you are configured to receive error notifications.
- The password is incorrect. This could happen if you change the API user's password in Autotask but did not update the .qwc file.
We recommend that for this API security level, you select the Not required to change password (password does not expire) setting in Other > Miscellaneous. - The user account is locked (after a certain number of unsuccessful login attempts).
This is usually the result of a changed password that was not fixed in time. You must first fix the password issue, then unlock the account. - The Autotask instance is inactive.
Hover over the sync message to display the actual error, and if available, click the link to open the corresponding Transfer History page..
Menu
| Menu Option | Description |
|---|---|
| Edit | Opens the Edit Web Connector page. Refer to Adding or editing a single or first web connector. |
| Manage Naming Conventions | Opens the page where you determine the naming convention for the items that this integration will create in your QuickBooks Item List. Refer to Managing Naming Conventions. |
|
Manage Mappings (Autotask > QuickBooks) |
|
| Billing Code > Account |
Refer to Mapping billing codes to QuickBooks financial accounts. |
|
Expense Category > Account |
Opens the Expense Category Mapping page. Refer to Mapping expense categories to QuickBooks accounts. |
| Line of Business > Class | |
|
Resource > Employee/Vendor
|
Refer to Mapping resources to QuickBooks employees and vendors. |
|
Payroll Category > Payroll Item |
Refer to Mapping payroll categories for Timesheets transfers. |


