Mapping lines of business to QuickBooks classes
PERMISSIONS Admin access to the QuickBooks data file and security level with permission to configure the QuickBooks Extension. Refer to Admin security settings.
NAVIGATION Left Navigation Menu > Admin > Admin Categories > Extensions & Integrations > QuickBooks Extension > Web Connectors > right-click > Manage Mappings (Autotask > QuickBooks) > Line of Business > Class
BEFORE YOU BEGIN For Autotask to support classes, Organizational Structure must be enabled, and division > line of business pairings must be set up. Refer to Setting up organizational structure.
On the Manage Line of Business to QuickBooks Class Mappings page, map your Autotask division > line of business pairings to QB classes. To open the page, use the path(s) in the Security and navigation section above. When billing items are transferred to QB, the class that gets assigned is based on their Autotask line of business and this mapping.
Line of business to QB class mappings are web connector-specific.
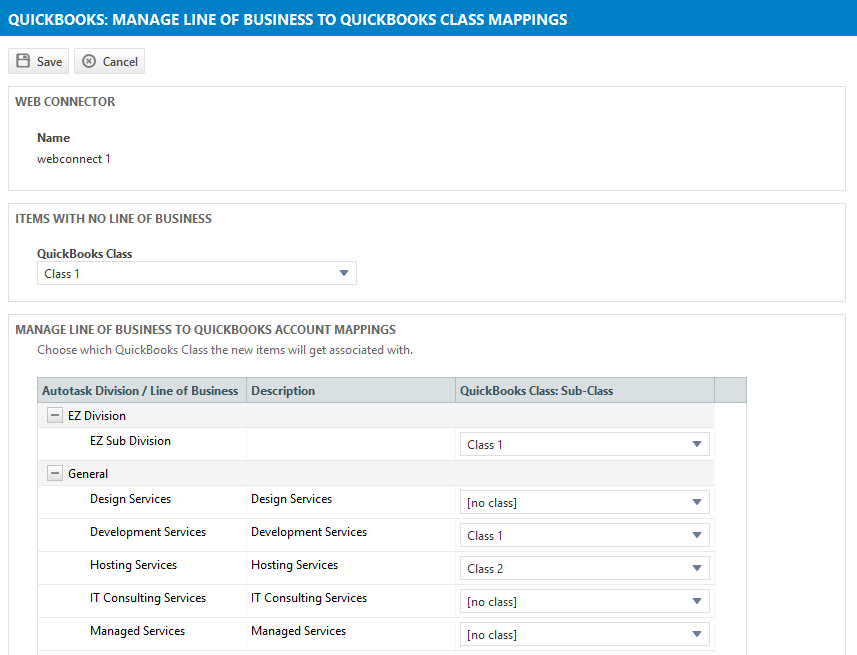
The table displays all lines of business (including inactive ones), as configured in Left Navigation Menu > Admin > Admin Categories > Organization Settings & Users > Your Organization > Organizational Structure, grouped by division.
To map a line of business to a class:
- If you want to assign a QB class to any Items with No Line of Business, click on the dropdown control and select a class.
- Click the drop-down menu in the QB Class: Sub-Class column on a line of business row.
NOTE Division rows do not have a drop-down list in this column.
The default option is [no class]. Below that, all QB classes and sub-classes (up to 5 levels deep) will be listed.
- Select the class: sub-class to map the division > line of business pairing to.
- If not all Autotask billing items will have a line of business, [no class] is the default setting when these billing items are transferred to QB. To assign a class in QB, click the drop-down menu above the list and select one.
- Click Save.


