Configuring the integration for multiple users
NOTE To learn everything about the QuickBooks Extension for Desktop, refer to the landing page for documentation links, configuration steps, videos, and walk-throughs that help you set it up.
The new QuickBooks integration supports multiple users running the Web Connector App in both single and multiple QuickBooks company files. The following setup steps must be completed for each web connector and QuickBooks company file.
On the Autotask Web Connector page, once the first user has run the web connector for the first time, a Company File Location is displayed. If multiple users have access to the same QuickBooks company file, it will be located on a drive or VM that can be accessed by all.
How this drive is mapped to each user's PC does not matter for normal QuickBooks access. However, for the new QuickBooks integration, the drive letter and path must be exactly the same for each user.
EXAMPLE Q:\Intuit\QuickBooks\Company Files\AcmeCorp.qbw
NOTE We highly recommend that you use drive letter mapping instead of UNC paths. Some customers reported issues with UNC paths.
If you must map your local organization file to a different common drive letter after you configured the first web connector, so all users can access it, don't forget to clear the organization location. Refer to Step 5: Test Connection (in Autotask).
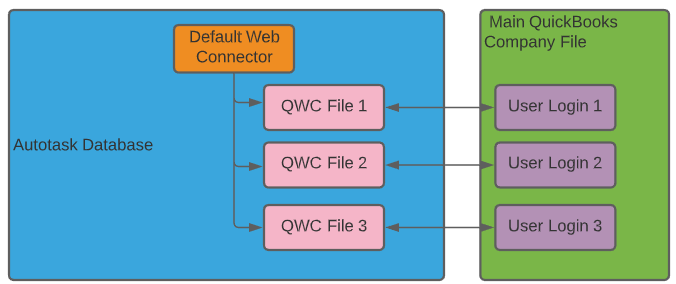
To make it possible for multiple users to log into a single QuickBooks file with their unique username and initiate a data transfer or sync, a separate QWC file must be downloaded for each additional user. 
Configuring the web connector in Autotask and the Intuit Web Connector App in QuickBooks requires admin permissions in both Autotask and QuickBooks.
- If every user has admin permissions in both Autotask and QuickBooks, they can all access the one and only web connector file in Left Navigation Menu > Admin > Admin Categories > Extensions & Integrations > QuickBooks Extension
- and follow steps 1 - 4 as described in Adding or editing a single or first web connector.
- If, as is likely, not everyone is an admin in both applications, the Admin will have to configure it for them.
To set up the web connector for another user, do the following:
- Using any app that allows you to take remote control of your team mates' computers, log into Autotask using your own (Admin) user account.
- Go to Left Navigation Menu > Admin > Admin Categories > Extensions & Integrations > QuickBooks Extension and edit the web connector.
IMPORTANT Do not create a second web connector!
- Download and install the web connector app to your colleague's computer. Refer to Step 1: Download the Intuit Web Connector (in Autotask).
- Skip steps 2 and 3. Go to Step 4 and click Download .qwc File.
Each download of the QWC file is unique enough for QuickBooks to see it as a unique app. - In single-user mode, log into your QuickBooks company file on your team mate's computer, using a QuickBooks Admin account.
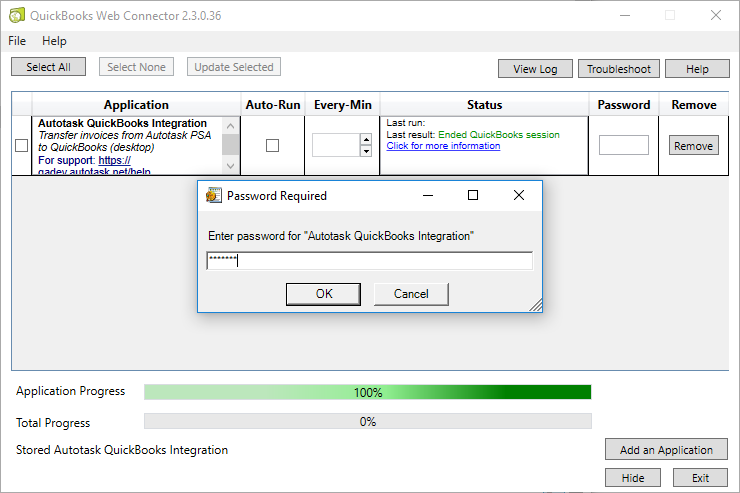
- Open the QuickBooks Web Connector app and select File > Add an Application.

- Browse to the location of the .qwc file you downloaded to your colleague's computer, select it and click Open.
- When prompted, enter the password for the API user account whose credentials are used to access Autotask, and save the password in the connector. Refer to Create an API user account for the QB Web Connector integration.

- Click OK.
- If you want this user to access multiple QuickBooks company files, repeat this process in each web connector and matching company file.
The QuickBooks Web connector app is now configured on your colleague's machine and available when they log into QuickBooks with their own username and password.
When invoices, purchase orders, etc are transferred from Autotask to QuickBooks, it is sometimes necessary to set up new customer records, items, or financial accounts. This requires Admin permissions in QuickBooks, which not all QuickBooks users will have. Because the user who initiates it does not have permission to create new items, customers, etc., the transfer will fail or generate constant warnings.
To get around this limitation, you must specify a user account with Admin permissions that the QuickBooks Web Connector app will use for the data transfer. Your team mate can initiate the update with limited permissions, but the integration will use an admin user account to effect the transfer. If you have multiple users accessing multiple QuickBooks files, this permission must be configured for each company file.
You can use the system Admin account or, if you want to create a more specific audit trail, another full Admin account created for this purpose. Call it something like Autotask Integration Admin User.
To specify the Admin user, do the following:
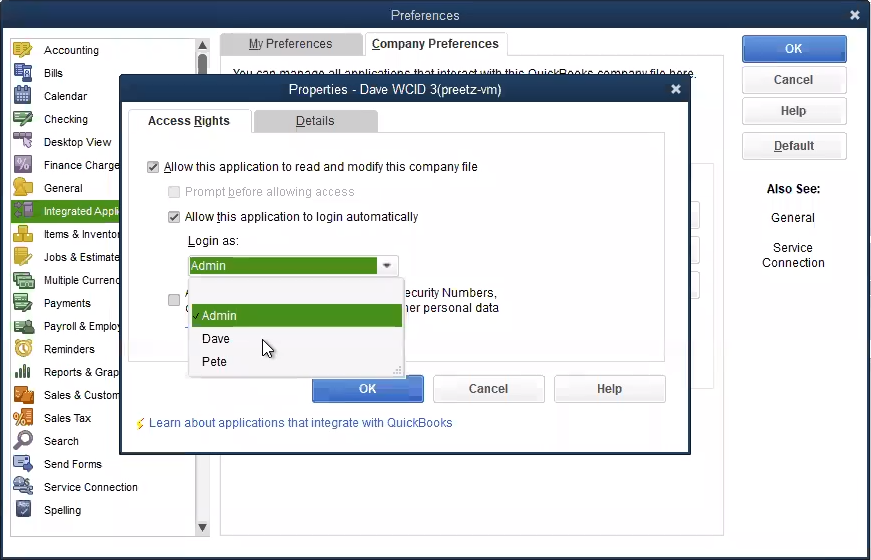
- In QuickBooks, go to Edit > Preferences.
- Select Integrated Applications and click the Company Preferences tab.
- Select Autotask QuickBooks Integration and click Properties.
- On the Access Rights tab, click the Login as: control and select the Admin user, or the admin user you created for this purpose.

- Click OK.
This will enable team mates without admin permission to log into QuickBooks with their own user account, but run the web connector to retrieve data from Autotask using an Admin account. It will prevent error messages and connection failures that are based on insufficient permissions.
IMPORTANT The Login as: control contains all user accounts, not just admin accounts. If you select a user with insufficient permissions, it will cause the integration to fail.


