Mapping expense categories to QuickBooks accounts
PERMISSIONS Admin access to the QuickBooks data file and security level with permission to configure the QuickBooks Extension. Refer to Admin security settings.
NAVIGATION Left Navigation Menu > Admin > Admin Categories > Extensions & Integrations > QuickBooks Extension > Web Connectors > right-click > Manage Mappings (Autotask > QuickBooks) > Expense Category > Account
About the Expense Mappings page
On the Expense Category Mapping page, you configure the general expense transfer settings for this web connector, and map transferred expense items to the QuickBooks (QB) expense accounts the resources will be reimbursed from.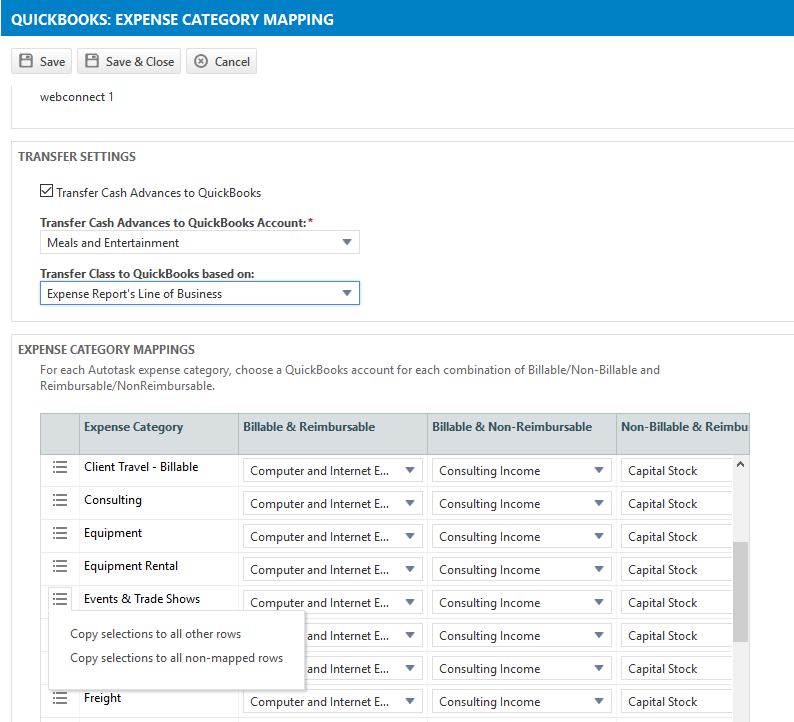
Mapping expense categories
You can map expense categories to different QuickBooks expense accounts, depending on whether they are billable or reimbursable. For information on how the billable status of an expense is set, refer to Adding and editing expenses. For information on how Payment Types determine if an expense is reimbursable, refer to Payment types.
To adjust your QuickBooks Expense Report integration settings and map your Expense Categories, do the following:
-
 Open your QuickBooks file and run the QuickBooks web connector to ensure that financial accounts and classes have been synced to Autotask.
 -
 In Autotask, navigate to Left Navigation Menu > Admin > Admin Categories > Extensions & Integrations > QuickBooks Extension > Web Connectors > context menu > Manage Mappings (Autotask > QuickBooks) > Expense Category > Account.
 - Populate the following fields and save your settings.
| Field Name | Description |
|---|---|
| Transfer Settings | |
| Transfer cash advances to QuickBooks |
Select this check box to transfer cash advances to QuickBooks. Cash advances create a negative billing item in QuickBooks, subtracting the cash advance amount from the amount that is reimbursable. If selected, you are required to select a QuickBooks account for the cash advance from a drop-down box that lists all QuickBooks accounts. Recommended Setting: On, if your local organization gives cash advances. |
| Transfer Cash Advances to QuickBooks Account |
Select a QuickBooks account for the cash advance from a drop-down list that lists all QuickBooks accounts. |
| Transfer Class to QuickBooks based on: |
Select from the following options: No Mapping Use this setting if your local organization doesn't use classes in QuickBooks. Resource's Default Department
Use this setting to transfer the name of the resource's default department as the expense items' Class. NOTE If you select this setting, you must enable Class Tracking in QuickBooks or the transfer will fail. You enable Class Tracking under Edit > Preferences > Accounting > Company Preferences. Expense Report's Line of Business- Use this setting to transfer the Line of Business associated with the expense report as the expense items' Class. Make sure you set up your Line of Business mappings. Refer to Mapping lines of business to QuickBooks classes. NOTE If you select this setting, you must enable Class Tracking in QuickBooks or the transfer will fail. You enable Class Tracking under Edit > Preferences > Accounting > Company Preferences. During the transfer, we will check to see if there is a Class in QuickBooks that has the same name as the resource's default department or the expense report's Line of Business:
|
| Expense Category Mappings | |
| Expense Category Mapping |
This section contains a table that lists all Autotask expense categories in alphabetical order. You can select a different financial account for each category, depending on whether the expense transferred is:
To make a selection, click the dropdown icon and select a QuickBooks account in each column of the first category. To populate all other categories with the same settings, hover over the context menu and select Copy selections to all other rows. To populate only unmapped categories with the same settings, select Copy selections to all non-mapped rows. NOTE If you select a value for a row in any column, you must populate all columns. |


