Adding and editing time on a task
PERMISSIONS All users
NAVIGATION My > Service Desk > Tasks & Tickets > click on a task number > Quick Add bar > select Time Entry (Alt+1)
NAVIGATION Left Navigation Menu > Projects > Search > Projects > click on the Project Name > Schedule > task context menu > General > View Detail > Accessory tabs > Activity > click the New Time Entry button
IMPORTANT By default, notes and time entry pages launched from a task or ticket in New, Edit, or View mode open in a modal dialog box. For information about dialog boxes and how they differ from browser pages, refer to Minimizing Dialog Boxes.
Task time entry methods
On tasks, you can enter time using either Project Time (decimal hours) or Start Stop Time.
- Project Time is the default time entry method if Start Stop Time is not explicitly required. It is identical to the way regular time is entered, and is simple and quick. It also allows you to enter time on multiple days at once. Refer to Time Entry Details when using decimal time (Project Time).
- Start Stop Time is identical to the way time is entered on tickets. You have access to additional fields that are not available with the Project Time Entry method. Refer to Time Entry Details when using Start/Stop Time.
Both time entry methods are available from context menus. On the Task page, clicking the Record button on the stopwatch will launch the Start Stop Time dialog box or page, clicking the Time Entry option on the Quick Add bar will launch the Project Time Entry page or dialog box.
You can make the Start Stop Time entry method required using:
- A timesheet system setting. Your administrator can make start/stop time required by enabling the Require users to enter start and stop time on project tasks system setting.
- A contract setting. When you create a contract, you can select theRequire users to enter start and stop time on project tasks setting.
If one of these settings applies, the Enter Time option on the task context menu is grayed out, and Project Time is not available on the Current Timesheet.
Selecting the task
If you launch the New Task Time Entry page from a location other than the Task or Edit Task page, an additional task selection page will open first, to allow you to select the task you want to enter time on.
- Open your current timesheet or another unsubmitted timesheet.
- Select New > Start/Stop Time or New > Project Time. The New Task Time Entry page opens in task selection mode.
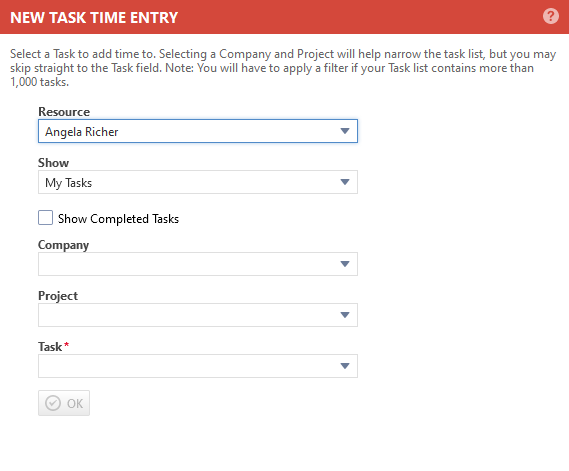
- Complete the following fields:
| Field | Description |
|---|---|
|
Resource |
By default, users can add, edit, and delete only their own time entries. Your Autotask administrator can enable timesheet approvers, or both timesheet approvers and administrators, to enter time and submit time off requests on other users' behalf. For users who have proxy time entry permission, the Proxy Time Entry section and the Resource selector field will appear on all time entry pages, so they can create a time entry for another user. They can also view users' unsubmitted timesheets. Proxy time entry is enabled through a system setting. Refer to Proxy time entry. IMPORTANT To enter time, approvers must have permission to view the tasks and tickets in question. To enter time on behalf of a different user or view their timesheet, click the Resource drop-down selector and select the user's name. |
|
Show |
This field allows you to apply a filter to the list of tasks that will appear in the Task field.
NOTE The selections in this drop-down menu are determined by the Can enter time on setting, located on Left Navigation Menu > Admin > Organization Settings & Users > Resources/Users (HR) > Security > Security Levels. |
| Show Completed Tasks | Select this check box if you want the list in the Task field to include completed tasks that meet the criteria that you specified in the Show field. NOTE This field is hidden if Allow time entry on completed tasks is not enabled. |
|
Organization |
This filter contains all active organizations you have permission to view, and that would make at least one task available in the Task field below. When you select a specific organization, the Project and Task fields will be filtered to include only projects and tasks belonging to the selected organization. |
|
Project |
This filter contains all active, non-complete projects you have permission to view, and that would make at least one task available in the Task field below. When you select a specific project, the Task field will be filtered to include only tasks belonging to the selected project. |
|
Task |
This field contains a list of all tasks that match the criteria in the Show, Show Completed Tasks, Organization and Project filters. Click the dropdown arrow and select a task to enter time on. |
- Click OK. The New Task Time Entry page will open, with the current date selected.
Header elements

| Button or field | Description |
|---|---|
|
Save & Close |
Saves the note or time entry and closes the dialog box. IMPORTANT If the New/Edit Time Entry or New/Edit Note dialog is saved on the Edit Task or Edit Ticket page, both the details panel and main canvas will be updated. Any unsaved changes in those areas will be kept. Any changes to the Status or Quick Edit fields made on the time entry or note will also be applied to their corresponding ticket fields. If a status or quick edit field supplied by the dialog fields conflicts with an unsaved change on the Edit Ticket page, the dialog’s value will be used. |
|
Save & New |
Saves the note or time entry and opens a new dialog box. |
|
Save & Forward/Modify (tickets only) |
Saves and closes the note or time entry and opens the Forward/Modify Ticket(s) page. Refer to Forwarding and modifying tickets. NOTE If the Ticket Note or Ticket Time Entry page is opened from the Edit Ticket page, Forward/Modify is disabled. |
|
Change Task (task time entries only) |
Click Yes on the Warning dialog.
|
|
Enter Speed Code or Choose Template |
Form templates follow the limitations of the currently applied category and the user's security settings. If a form template uses a value or provides content that is not allowed in a field by the category or the user's security settings, the field will not be updated. This includes the category field itself. IMPORTANT Selecting a form template is the equivalent of manually populating the form. Form template settings will override any previously populated field content, including notification settings, additional contacts, and secondary resources. |
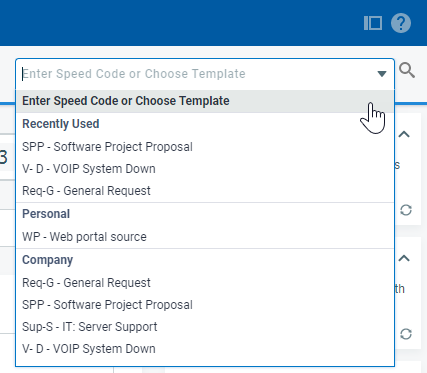
Decimal time (Project Time) entry allows you to enter time on multiple days at once, and you have the option to use the same Summary and Internal Notes for all days. This feature is available when you apply a form template, as well. The Apply Form Template dialog box is triggered under the following circumstances:
- If the form template chosen contains a value for Hours Worked, you will need to select the days you want to apply the hours to.

- If the applied form template contains a value for Summary Notes or Internal Notes and the Use the same Summary and Internal Notes for all days checkbox is checked, the values will be applied to the Summary Notes and/or Internal Notes fields for all days. If it is not checked, the Apply Form Template dialog box will open.
Do the following:
- Optionally, edit the Hours Worked, Summary Notes, and Internal Notes.
- Select the days these values apply to.
- Click OK.

| Element | Description |
|---|---|
|
|
The entity header identifies the parent entity the note or time entry is associated with. It shows the Task Number or Ticket Number, Task Title or Ticket Title, and Organization fields, plus the quick copy icons. |
|
Stopwatch |
The stopwatch starts running as soon as you open the task, ticket or time entry page. For detailed information, refer to The task or ticket stopwatch. If the setting Enable [Entity] Stopwatch is cleared for the entity category, the stopwatch will not appear. |
 Task or
  Ticket entity header
Adding or editing a time entry
- To open the page, use the path(s) in the Security and navigation section above.
- Complete the fields in the following sections:

By default, users can add, edit, and delete only their own time entries. Your Autotask administrator can enable timesheet approvers, or both timesheet approvers and administrators, to enter time and submit time off requests on other users' behalf. For users who have proxy time entry permission, the Proxy Time Entry section and the Resource selector field will appear on all time entry pages, so they can create a time entry for another user. They can also view users' unsubmitted timesheets.
Proxy time entry is enabled through a system setting. Refer to Proxy time entry.
IMPORTANT To enter time, approvers must have permission to view the tasks and tickets in question.
To enter time on behalf of a different user or view their timesheet, click the Resource drop-down selector and select the user's name.

| Field | Description |
|---|---|
|
Status |
The Status defaults to the current status of the parent entity when the page or dialog box is opened. The value you select will be set as the status of the parent entity when the dialog box or page is saved.
Special situations:
|
|
Status as of <date/time stamp> |
The date/time stamp indicates the date and time the status was last refreshed from the task or ticket. If you have not clicked the Get current Status link, it will be the date and time you opened the page. |
|
Get current Status |
If the time entry page is open for a long time, it is possible for the Status field to be changed by another user or a workflow rule.
|
|
Update Status on {#} incident(s) (tickets only) |
This check box will only appear if the ticket to which the note or time entry is being added is a problem ticket with at least one incident. If you open this dialog box or page from the Edit Ticket page, this check box will not appear. If the Can edit Status of Complete tickets (does not apply to Autotask Web Services/API) permission is cleared for your security level, you can update the status of incomplete incidents. If it is selected, you can update the status of all incidents. |
PERMISSIONS Permission to change billing settings on task time entries. These permissions are individually assigned to the security level, so you could have permission to change some selected settings, or none of them. You will only see the options that you are authorized to change. Refer to Time Entry Permissions.
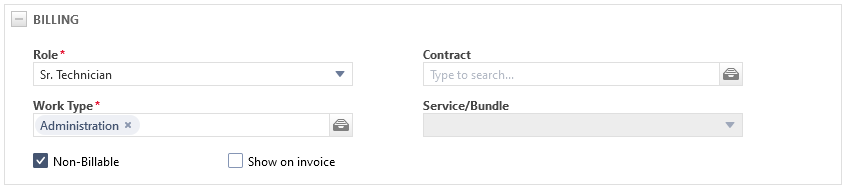
Review the following settings:
| Field | Description |
|---|---|
|
Role |
Default: 1. The role selected on the task's Primary Resource or Secondary Resources field. 2. The user's default role/department combination for the task's department. Selection Options: The drop-down selector will contain the currently selected role, even if it is inactive (if you are editing a time entry), plus all active Service Desk roles associated with you, plus any roles associated through resource-department relationships. |
| Work Type |
Default: Defaults to the task's work type. If the task’s work type is inactive, it will default to [blank]. If you select a new work type, that work type applies to this time entry only. Selection Options: The drop-down selector will contain the task's work type, even if it is inactive (if you are editing a time entry). If the task’s category has the Work type limiting setting enabled, it will contain all active work types associated with this task’s department. Otherwise, it will contain all active work types. Security: If your security level has the Can modify Work Type on task and issue time entries permission cleared, this field will not appear. Special Situations:
|
|
Contract |
Default: Defaults to the project's contract, even if it is inactive. You can change the default contract inherited from the ticket or, if there is no associated contract, you can choose a contract to apply to this time entry. Selection Options: The drop-down selector will contain all active contracts for the project’s organization and its parent organization, plus the project’s contract even if it is inactive. If the user is editing an existing time entry, the current selection will also appear even if it is inactive. Security: If your security level has the Can modify Contract on task and issue time entries permission cleared, this field will not appear. Special Situations:
|
|
Service/Bundle |
Default:This field will only appear if a recurring service contract was selected. It defaults to the task's service or service bundle, even if it is inactive. Selection Options: The drop-down selector will contain all active services and service bundles for the contract selected in the project's Contract field, plus the task’s service or service bundle, even if it is inactive. If the user is editing an existing time entry, the current selection will also appear even if it is inactive. Security: If your security level has theCan modify Service/Bundle on task/issue time entries and project charges permission cleared, this field will not appear. |
|
Non-Billable |
If the check box is cleared, the time entry will be billable and will appear on the invoice. This setting will override all defaults. Default: This check box inherits the setting of the work type selected in the Work Type field. If the Work Type field has a billable setting of Non-Billable - Do not show on invoice or Non-Billable - Show on invoice as “No charge”, it will default to selected. Otherwise, will default to cleared. Security: If your security level has the Can modify Non-Billable setting on [entity] time entries permission cleared, this field will not appear. Special Situations:
|
|
Show on invoice |
Billable time entries appear on the invoice automatically. This check box is only enabled when the Non-Billable check box is selected. Default: This check box inherits the setting of the work type selected in time entry's Work Type field. If the Work Type field has a billable setting of Non-Billable - Do not show on invoice, it will default to cleared. Otherwise, it will default to selected. Security: If your security level has the Can modify Show on Invoice setting on [entity] time entries permission cleared, this field will not appear. Special Situations:
|
On tasks, you can enter time using either Project Time (decimal hours) or Start Stop Time. Refer to About Project Time and Start Stop Time.
To enter decimal time (Project Time), do the following:
- From the task's context menu, select Enter Time.
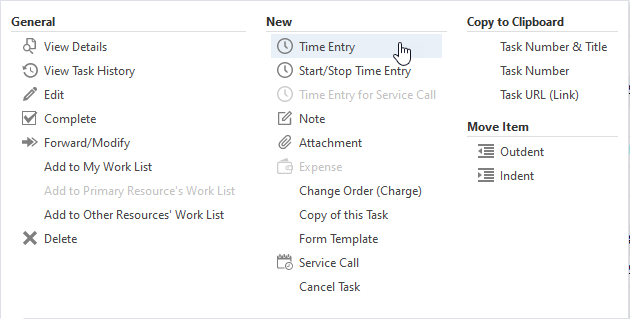
Or, on the timesheet, select Project Time.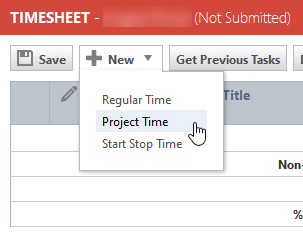
The New Task Time Entry page will open. Only the Time Entry Details section will be different from the one used for start/ stop time entry.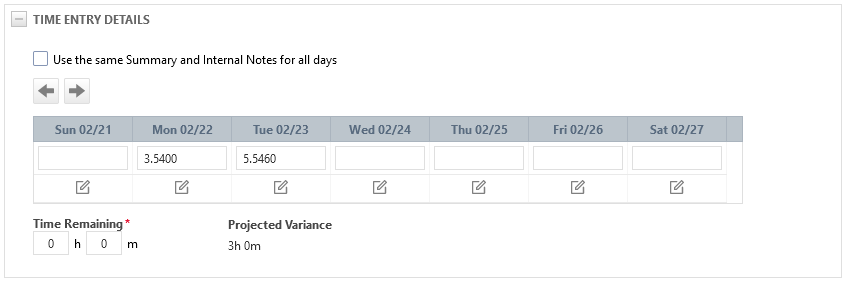
- Enter the number of hours in decimal time. You can enter time for multiple dates and either enter separate summary and internal notes, or apply the same summary notes and internal notes to all time entries.
- The Require user to enter summary notes when entering project task time system setting determines if you must enter summary notes. If they are required, select an entry method:
- If the Use the same Summary and Internal Notes for all days check box is selected, complete the combined Summary Notes and Internal Notes fields.
- If the Use the same Summary and Internal Notes for all days is cleared, the combined Summary Notes and Internal Notes fields do not appear. Instead, a note icon
 appears for each date. Click on the icon to open the Enter Notes dialog box for each date. Hovering over the note icon will show the Summary Notes and Internal Notes that were entered, if any.
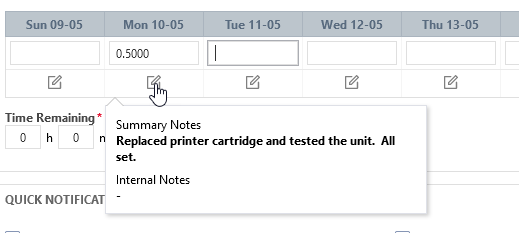
- If the Use the same Summary and Internal Notes for all days check box is selected, complete the combined Summary Notes and Internal Notes fields.
- Enter or update the Hours Worked, Summary Notes and Internal Notes fields.
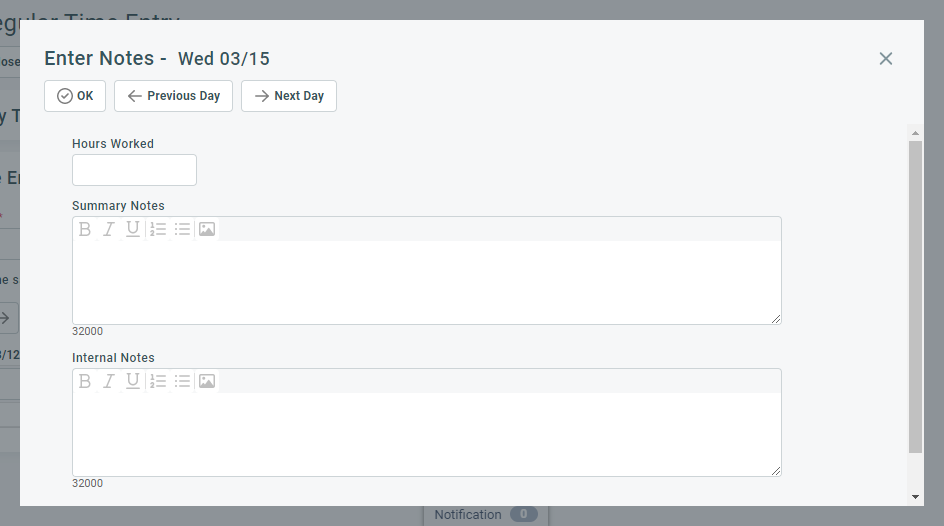
- To go to a different day, click the Previous Day or Next Day buttons at the top of the dialog box.
- To save the time entries and notes, click OK.
- If you set the ticket status to Complete and entered summary notes for at least one day, the last day's summary notes will be saved as the reason for completion.
- If you set the ticket status to Complete and did not enter any summary notes, a message bar will prompt you to enter summary notes for at least one day.

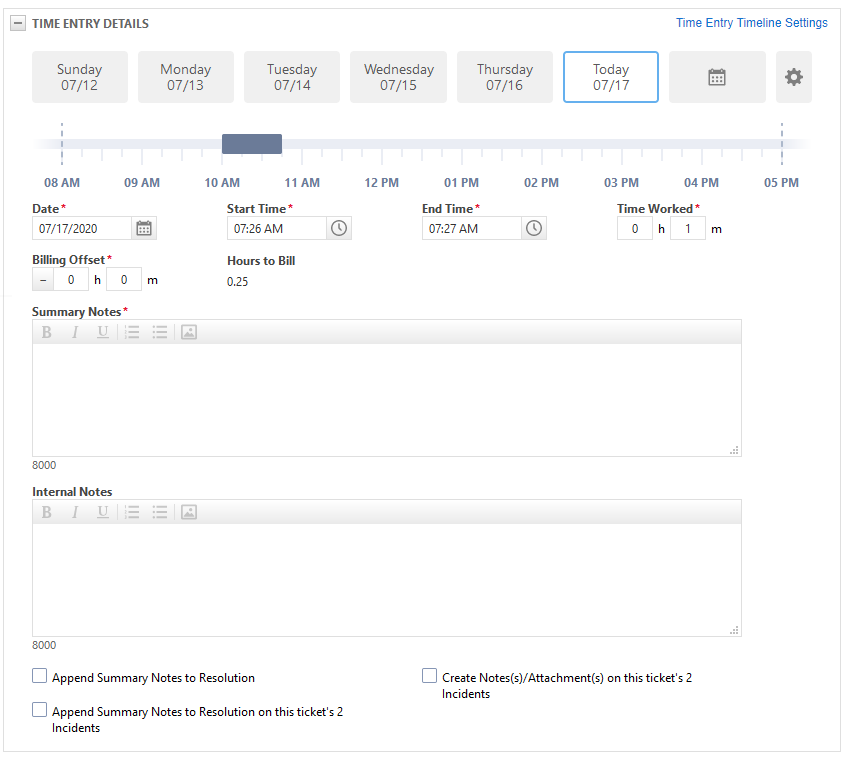
The Time Entry Details section contains both a visual timeline selector and date and time data fields. They both represent the same data, so updating one automatically updates the other.
On the New Task Time Entry page (using Start/Stop Time), the timeline selector and date buttons are disabled for all users.
To enable the timeline selector or date buttons, do the following:
- Click the Time Entry Timeline Settings link.

- In the Timeline Settings dialog box, select Display the Time Entry Timeline. The Start Point and End Point fields become enabled.
- Select the earliest time you usually work on tickets as the Start Point, and the latest as the End Point of the timeline. To extend the timeline to the full 24 hours, select the same time in both fields.
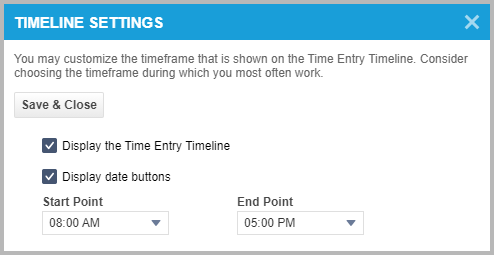
- Select Display date buttons if you want the date buttons to appear.
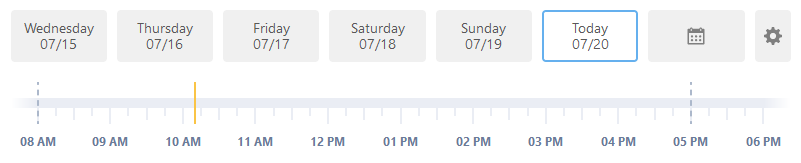
- Click Save & Close. The timeline appears above the time entry fields. The current time is indicated by the yellow line, and your company's business hours, by dotted gray lines.
- To re-open the Settings dialog box, click Time Entry Timeline Settings or the Settings icon
 on the right-most square of the date buttons.
To hide the timeline selector or date buttons, do the following:
- Click Time Entry Timeline Settings or the Settings icon on the right-most square of the date buttons. The Timeline Settings dialog box will open.
- To remove the date buttons, clear Display date buttons.
- To remove the timeline selector entirely, clear Display the Time Entry Timeline. Note that if Display the Time Entry Timeline is cleared, the Display date buttons option will be cleared as well. The timeline selector must be enabled to select the Display date buttons option.
- Click Save & Close.
To disable the timeline selector or date buttons, do the following:
- Click Time Entry Timeline Settings or the Settings icon on the right-most square of the date buttons. The Timeline Settings dialog box will open.
- To remove the date buttons, clear Display date buttons.
- To remove the timeline selector entirely, clear Display the Time Entry Timeline. Note that if Display the Time Entry Timeline is cleared, the Display date buttons option will be cleared as well. The timeline selector must be enabled to select the Display date buttons option.
- Click Save & Close.
The time entry timeline displays today's date and the five preceding days on a series of large buttons. Today is selected by default. To enter time for a different day, do the following:
- Click another square or, if the date is outside of the timeline, click the square with the calendar icon
 .
. - Use the calendar to navigate to the desired date. Use the -7d or -14d shortcuts if appropriate.
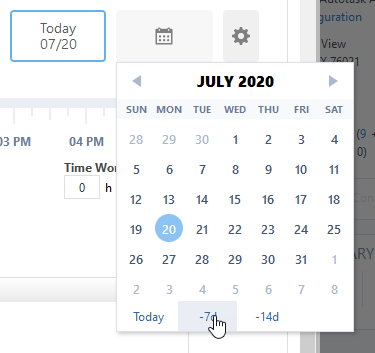
- The calendar is closed and the calendar icon is replaced by the selected date.
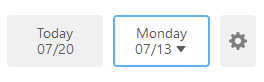
NOTE The date selected must be between two years before or after the current date. Time entries outside this time period can be created on tickets through an import. This option is not available for time entries on tasks. Refer to Importing or updating data.
All your existing task and ticket time entries on the selected day are shown as dark blue blocks on the timeline. A light blue block represents the current time entry. If the stopwatch is running on this dialog box or page, the selected area will expand accordingly in real time.
To enter time using the timeline do the following:
- Click anywhere on the timeline. If you clicked a time in the past, this time will populate the Start Time field. If you clicked a time in the future, this time will populate the End Time field. You then drag the light blue line to the left or right to highlight an area on the timeline.
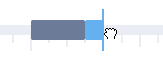
As you drag, the Start Time, End Time, and Time Worked fields will update in 15-minute increments in real time. If you drag the left edge of the selected area into a section of the timeline that represents a different day, the Date field will be updated to that day’s date in real time as well. - Let go of the mouse key to finish your selection.
NOTE If system settings or ticket category settings determine that ticket time must be rounded, rounding is applied as soon as an area is selected.
IMPORTANT If the stopwatch has been stopped and restarted, Autotask cannot currently know where during the stopwatch’s runtime it was paused. Because of this, we will still select the full area representing the time between the stopwatch’s supplied Start Time and End Time. In this case, the Time Worked will not equal the difference between these two times.
If the timeline is hidden, you don't want to use it, or you want to override it, you can manually populate the date and time fields along with the Summary Notes and Internal Notes fields. Any changes you make in the fields will immediately be reflected on the visual timeline.
Complete the following fields:
| Field | Description |
|---|---|
| Date |
The Date defaults to the current date, but you are able to select another date by entering it manually, clicking the calendar icon, or using the arrow keys. IMPORTANT If one or more of your work dates are outside the contract period for a fixed price or recurring contract, the contract will still be applied! NOTE The date selected must be between two years before or after the current date. Time entries outside this time period can be created on tickets through an import. This option is not available for time entries on tasks. Refer to Importing or updating data. |
|
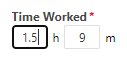
Start Time, End Time and Time Worked |
Start Time, End Time, and Time Worked are interdependent. Default:Start Time and End Time default to the current time.
For information on time entry shortcuts and formatting rules, refer to Date and time entry format rules. Special situations:
System Settings that impact time entries:
|
|
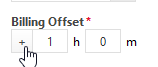
Billing Offset |
Time you want to bill to the customer can be more or less than the time worked. Click the plus or minus badge next to the Billing Offset field to toggle between addition and subtraction, and enter the hours and minutes. The translation to decimal hours occurs when the time entry is saved.
You cannot have a billing offset that causes your Hours to Bill value to be negative or greater than 24 hours. Default: Defaults to negative (-). System Settings that impact billing offsets: If the system setting to Round ticket time entries to the nearest # minutes (timesheet and billing entries will be rounded) is enabled, the offset time cannot be greater than the rounded worked time. |
| Hours to Bill |
This read-only field shows the amount of time that will appear on the Approve and Post page in decimal time. It is calculated from the Time Worked plus or minus the Billing Offset. The hours and minutes are shown in parentheses. |
|
Time Remaining (task only) |
The remaining hours on a task are calculated as (Estimated Hours - Actual Hours). If the original time estimate is too high or too low, you can manually update the estimate of remaining hours here. The difference between the original and the new estimate is accounted for in the Projected Variance field. For a detailed discussion, refer to Estimates and remaining hours. NOTE This manual adjustment will not affect the original estimated hours, which remain unrevised to allow accurate reporting on the difference between the estimated hours and the actual hours. |
|
Projected Variance (task only) |
The difference between the original estimated hours and the manually updated Time Remaining. Refer to Estimates and remaining hours. |
| Summary Notes |
The Summary Notes field appears on all types of time entries. You enter a description of the work that was performed. Rich Text is supported. Unlike internal notes, summary notes may be customer-facing and appear on invoices, notification emails, and in the Client Portal. Your Autotask administrator may have enabled system settings that make the Summary Notes field required. Refer to Require user to enter summary notes when entering ticket time, Require user to enter summary notes when entering project task time, and Require user to enter summary notes when entering regular time. If summary notes are required, you must enter at least one non-space character. NOTE To view summary notes of a regular time entry, you must change to the Report view of the timesheet and select Report Type > All Days, then scroll to the date. |
| Internal Notes |
The Internal Notes field appears on all types of time entries. Rich Text is supported. Unlike summary notes, internal notes are never exposed to customers, and are never required. |
|
Internal Notes visible to Co-managed |
This checkbox appears below the Internal Notes field of time entry pages. If checked, the internal notes are created with the Internal & Co-managed publish type. On the Time Entry form template, select one of the following:
|
| Append Summary Notes to Resolution (tickets only) |
If selected, the text entered into the Summary Notes or Description field will be added to the end of the Resolution field of the ticket. If there is already text in the Resolution field, two line breaks will separate the existing text from the text added. Security: This check box is available even if users do not have permission to edit tickets. NOTE If Knowledge Base is enabled and the ticket is used to create a Knowledge Base article, the contents of the Resolution field appear in the article. Refer to Creating Knowledge Base articles from tickets. |
| Append Summary Notes to Resolution on # incident(s) (tickets only) |
This check box only appears for notes and time entries on problem tickets associated with one or more incidents. If selected, the text entered into the Summary Notes (on time entries) or Description field (on ticket notes) will be appended to the end of the Resolution field on all of the ticket’s incidents. |
| Create Note(s) /Attachment(s) on # incident(s) (tickets only) |
This check box only appears for notes and time entries on problem tickets associated with one or more incidents. If selected, the note's Description or the time entry's Summary Notes, Internal Notes, and any new attachments are added to the ticket's incidents, as well. On the incidents, the Internal Notes are created as a reply to the Summary Notes. Security: This check box is available even if users do not have permission to edit tickets. |
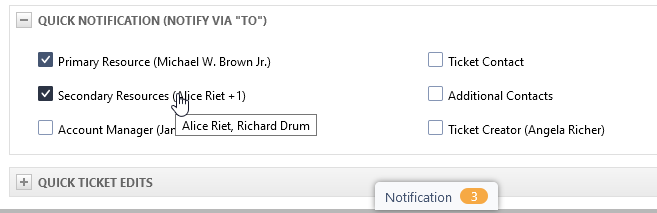
In the Quick Notification (Notify via "To") section, you can use check boxes to quickly add common role-based notification recipients to the note or time entry notification email. The selected recipients are added to the To: field; CC: and BCC: fields are not populated.
The check boxes are shortcuts to manually selecting or clearing role-based recipients on the Notification panel. If recipients are added or removed from the To: field on the Notification panel, the matching role-based check boxes will become selected or cleared.
The name of the user who is filling the role is added to the role name. If more than one person is added, +# is added to the first name. If the ticket does not have a value for a role, the check box for that recipient will still be enabled, because they can still be selected on the Notification panel. Adding or changing a value for a recipient via the Quick Ticket Edits section will cause the names next to that check box to be added or changed accordingly.
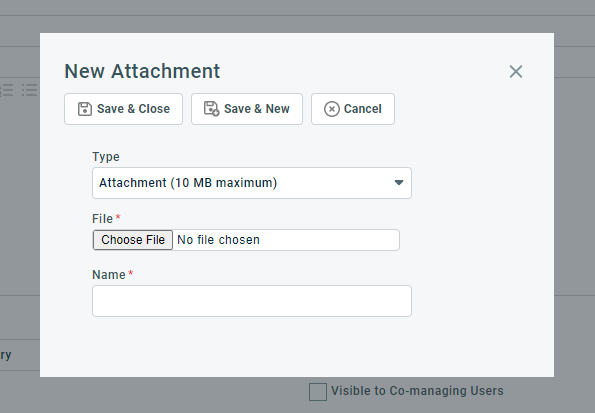
In this section, you add new attachments. They are saved as replies to the note or time entry they are added to.
The Add New Attachments section is always collapsed. When it is expanded on the New Note or New Time Entry form, the New Attachment dialog box will open automatically.
-
Complete the New Attachment dialog box. As you save each attachment, it will appear on the attachment table. Refer to Adding and managing attachments.
-
On notes that can become a notification email, attachments can be included. To attach the new attachment to the notification email, select Include Attachments in Email on the notification panel. You can make this a default setting.
-
To complete the attachment process, you must save the note or time entry. If you close without saving, the attachments will not be uploaded or attached to the parent entity.
NOTE When opened from the Ticket Time Entry dialog box or page, you can select the Internal Only check box. On the Note dialog box or page, this check box is missing and the attachment inherits the setting of the note.
If you edit a note or time entry that is associated with existing attachments, they appear in a separate Attachments section. This section will be expanded if the note or time entry has at least one attachment. It will not appear on the New Task Note, New Task Time Entry, New Ticket Note, and New Ticket Time Entry pages.
All users can view attachments they uploaded. To view attachments uploaded by other users, Can view Ticket and CRM notes and attachments marked as "Internal Only" and "Internal & Co-managing" permission is required.
When you edit a time entry, the Last Updated time stamp shows the date, time and resource who created or last modified the time entry.
The New and Edit pages for each entity feature a notification panel that is accessed from a persistent handle at the bottom of the page.
For more information, refer to Notification panel.
- Click one of the Save options. If validation fails (a required field was not populated), the notification panel is minimized and unpopulated fields are highlighted one after the other, until all issues are dealt with.
- If validation succeeds, Autotask will:
- apply any contract exclusions. Refer to What happens when you apply an excluded role or work type to a ticket or time entry?
- check to see if the contract is expired.
- check to see if the time entry crosses the end of business hours and an after-hours work type is configured. If so, the time entry will be split. Refer to After-Hours Time.
- send notification emails to any default or selected recipients. If you used decimal time entry on multiple days, only one notification email is sent. This email will contain the Time Entry Details entered on the last day of the work record. Refer to Notification emails.
- track the time against the ticket.
- enter the time on your (or the selected resource's) timesheet.
- move all time entries to Contracts > Approve & Post for financial approval and billing.
Time entries on tasks and tickets can be viewed on work entry drill-in tables accessed from your dashboard. Refer to Reviewing your hours worked.
After-Hours Time
If this time entry includes time outside your regular business hours (as defined by the Internal Location assigned to you) and the assigned Work Type has an After-Hours Work Type set up, you will be notified that the time entry will be split into two time entries when you click Save.
A second time entry for the after-hours time will be created. The second time entry will copy the summary and internal notes of the first, and a note about its creation will be added to the internal notes for both time entries. Any offset time will be applied to the latest occurring time entry. The time entries are then independent from each other. Rules such as rounding or Never Bill More/Less than are applied appropriately to each time entry. Refer to After-Hours Work Type.
If the time entry falls entirely outside regular business hours and the assigned Work Type has an After-Hours Work Type set up, you will see a warning letting you know that the After-Hours Work Type will be applied.
NOTE If no business hours were configured for the resource's internal location, they are assumed to be 8 AM to 6 PM.
Changing the task the time entry is associated with
You can change the task a time entry is associated with, both while creating, and while editing a time entry. If you change the task on a new time entry, any unsaved changes will be lost. You will simply return to the task selector page.
If you edit an existing time entry and click Change Task, the following happens:
- The same warning dialog will open, even though there are no unsaved changes.
- Click Yes to proceed. The Change Task dialog box will open. It will display three sections:
| Section Name | Description |
|---|---|
|
Task |
The Task section contains the same fields as the task selection page. Refer to Selecting the task. |
|
Task Status |
Refer to Task Status. |
|
Billing |
Refer to Billing. |
- Click Save & Close.


