Change management workflow
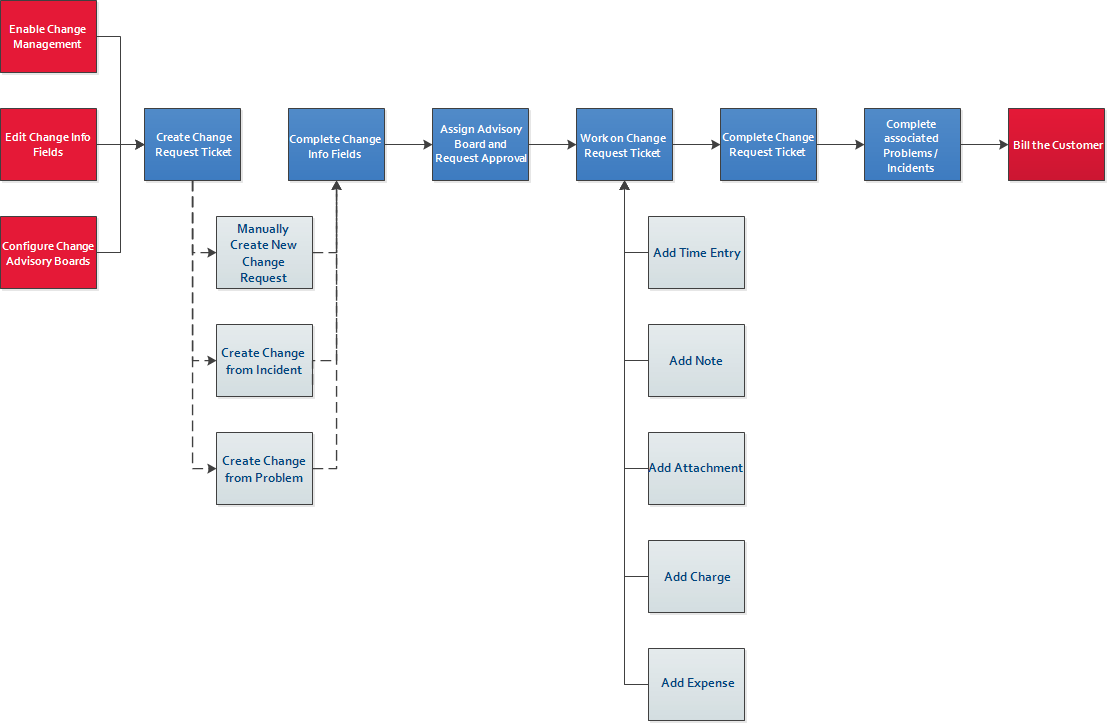
- Enable and configure the Change Management feature:
- If the Change Management feature is not enabled for your Autotask instance, submit a Kaseya Helpdesk request for it to be enabled.
- Configure the Change Info fields and decide which ones will be displayed in the Client Portal for client approvers. Refer to Managing change info fields.
- Configure the Change Advisory Boards. Refer to Managing change advisory boards.
- Create a ticket of ticket type Change Request:
- Manually create the Change Request ticket and then associate multiple Problems and/or Incidents with it
- Create a new Change Request from an Incident or Problem ticket
- Complete the Change Info fields. Refer to Add or edit change information.
- Assign one or more Change Advisory Boards, Other Resource Approvers, and/or Other Contact Approvers and click Request Approval. Once all necessary approvals have been obtained, the approval status changed to Approved.
- Work on the Change Request ticket. For a description of the Ticket page, refer to The Ticket page.
- Track the time you spend working on the ticket. Refer to Adding a ticket time entry.
- Add new information about the issue as a note. Refer to Adding a note to a task or ticket.
- Associate documents with the ticket. You can upload or link external information such as Word documents, images, or spreadsheets to the ticket. Refer to Adding and managing attachments.
- Track any billable and non-billable materials you use to resolve the ticket. Refer to Adding or editing a ticket charge.
- Track travel expenses associated with the ticket. Refer to Adding and editing expenses.
- Complete the Change Request ticket. Refer to Completing tickets.
- Complete the associated Problem and Incident tickets.
- Bill the customer. Refer to Invoicing.
Tools that automate or enhance ticket workflows
Incoming Email Processing automates case creation by converting emails to tickets. It can also update the status of the ticket, create a time entry, and change the billing role. Refer to Incoming email processing.
Form templates automatically populate multiple fields on the ticket page. By using a form template, you can update ticket fields in the same way a manual edit would; the data it contains will override any previous ticket content. Refer to Form templates.
Autotask’s Workflow Rule Engine is a powerful automation tool that continuously evaluates conditions of items (tickets, opportunities, etc.) and updates data or sends notifications when certain conditions are met. You can set these conditions and the resulting actions by creating workflow rules.
Then, each time a triggering event occurs (for example, when a ticket is edited), the item involved is evaluated against all applicable workflow rules. If there are matches for the event and the conditions, the workflow rule "fires," that is, the updates, actions, and notifications defined in the rule are executed automatically.
Refer to Autotask workflow rules.
Notifications are email messages generated in Autotask and sent to resources, customer contacts, and others when specific events occur. They facilitate the hand-off between assigned resources and help you communicate the ticket status to the customer. Refer to Notification emails.
In Autotask, service level management uses service level agreements (SLAs) to define your company's standards for service delivery, and then automatically monitors your success in meeting those standards. Refer to Introduction to service level management.
Use Autotask surveys to determine how satisfied customers are with your service delivery. Refer to Managing customer surveys.


