Managing shared tabs
PERMISSIONS By default, Administrators and managers have permission to share dashboard tabs. Shared Dashboard permissions can be granted to other resources through their security levels. Refer to Can manage Shared Dashboard Tabs .
NAVIGATION You manage and publish shared dashboards on the Shared Dashboards page. From the top navigation menu, click Dashboards > Manage Shared Tabs.
About the Shared Dashboard Tabs page
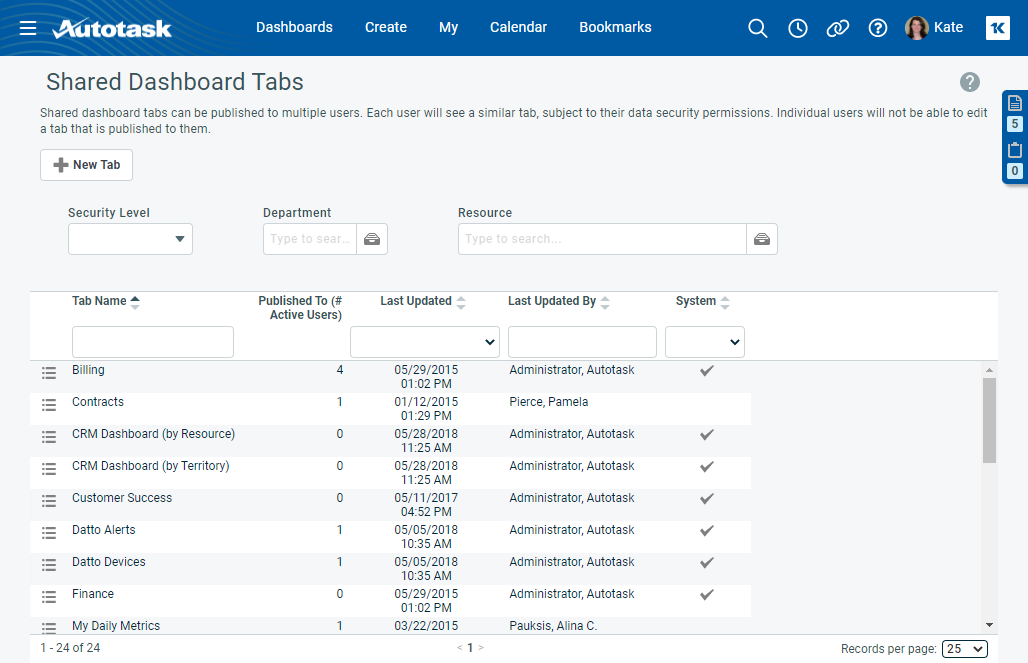
The Shared Dashboard Tabs page manages the following kinds of tabs:
- System tabs created by Datto that are made available to all partners. Refer to System and non-system shared tabs.
- Tabs that were created as personal dashboard tabs by any user in your company, and then shared. Refer to Sharing an existing personal tab.
- Tabs that were created as shared tabs on the Shared Dashboard Tabs page. Refer to Adding a new shared tab.
NOTE All tabs available to the Dashboard User (system) security level must be shared tabs.
Creating shared tabs
You can build an entirely new shared tab right from the Shared Dashboard Tabs list. It will only appear on your own dashboard if you publish it to yourself, your security level, or a department you are assigned to.
- On the Shared Dashboards page, click New Tab.
- Select settings for the tab and add widgets as you would for a personal dashboard tab. Refer to Managing dashboard tabs and Managing dashboard widgets.
- When the dashboard is complete, you must publish it. Refer to Publishing a shared dashboard tab.
When you share a dashboard, you can convert it into a shared tab, subject to the shared tab restrictions, or create a copy of your dashboard to share. When you share a dashboard, you must also publish the dashboard to the resources that need to access it.
- To open the page, use the path(s) in the Security and navigation section above.
- Open the dashboard tab you want to share.
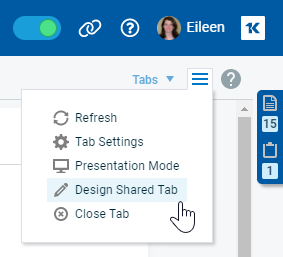
- Click the tab menu icon
 on the tab strip and select Share Tab.
 - On the Share Tab page, select an option.
| Option | Description |
|---|---|
| I want to keep my own version of this tab | This option adds a copy of the dashboard tab to the Shared Dashboards page as a unique tab, separate from your original. You can make changes to your original tab or to the copy without affecting the other dashboard. |
| I want to convert this tab to a shared tab | This option changes your original tab to a shared tab, subject to the shared tab rules. You can no longer manage the dashboard (edit, copy, or delete) from your personal dashboard page. You or any other user with permission to share dashboards can edit the tab from the Shared Dashboard Tabs list. Those changes impact all published instances of the dashboard. |
- Click Next.
The next page shows the Tab Name and the selection for widget positioning that the shared tab inherited from the original tab.
- Optionally, change the name and the widget positioning setting. For information about these settings, refer to Managing dashboard tabs.
- Optionally, modify the tab level filter settings. Refer to Tab settings and tab-level filters.
- Click Finish.
An alert displays to confirm that the dashboard has been added to the list on the Shared Dashboards page.
- Click Design this tab to make changes to the dashboard, or Publish this tab to open the Publish Shared Dashboard Tab page.
Refer to Managing dashboard widgets and Publishing a shared dashboard tab.
NOTE For security purposes, your instance of Autotask may not allow the sharing of HTML widgets. This option is controlled by a System Setting. Refer to Allow HTML widgets on shared dashboard tabs.
Filtering shared tabs by security level, department, or resource
Below the New Tab button, three filters will allow you to view the list of shared dashboard tabs that have been published to a selected security level, department, or resource.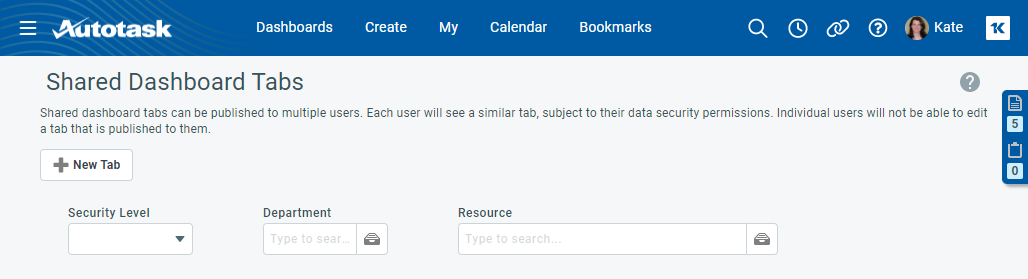
Context menu
| Menu option | Description | Available for system tabs? | ||||||||||
|---|---|---|---|---|---|---|---|---|---|---|---|---|
|
Design |
Any user with permission to manage shared dashboards can design and modify any shared tab from the Shared Dashboard Tabs page and the tab menu of the published tab. When you design a shared tab, any changes you make will apply to all published instances of the dashboard. Changes will show in the published dashboard tabs as soon as they are refreshed either manually or by schedule. To modify the settings of a shared tab, do the following:
|
|
||||||||||
|
Tab Settings |
Refer to Tab settings and tab-level filters. |
|
||||||||||
|
Publish |
Refer to Publishing a shared dashboard tab. |
|
||||||||||
|
Copy |
When you copy a shared dashboard, you copy the tab, tab-level filter, widgets, and widget configuration to create a new shared dashboard. The new dashboard appears in the list of shared dashboards. The Publish settings are not copied, so you must publish the new dashboard.
TIP You can click the Tab Name header to reverse the sort order of the list. Use the quick filter row to sort for the desired tab based on tab name. time of last edit. or resource who last edited.
The new dashboard tab appears in the list of shared dashboards. For information on editing or publishing dashboard tabs, refer Managing dashboard tabs or Publishing a shared dashboard tab. TIP All users can copy a shared dashboard tab for personal use: from the dashboard menu select Add Tab, in the Add Tab dialog, select Start with a copy of an existing tab; from the menu, select the shared tab to copy; complete adding the new tab as described in Managing dashboard tabs. |
|
||||||||||
|
Delete |
When you delete a shared dashboard tab, it is removed from all personal dashboards to which it was published. The deletion will take effect on the next scheduled or manual refresh. Deletion cannot be undone.
|
|