Configuring invoice transfer
NOTE To learn everything about the QuickBooks Extension for Desktop, refer to the landing page for documentation links, configuration steps, videos, and walk-throughs that help you set it up.
The QuickBooks Extension allows you to transfer invoices that were marked as Ready to transfer from Autotask into QuickBooks.
Invoice transfer workflow
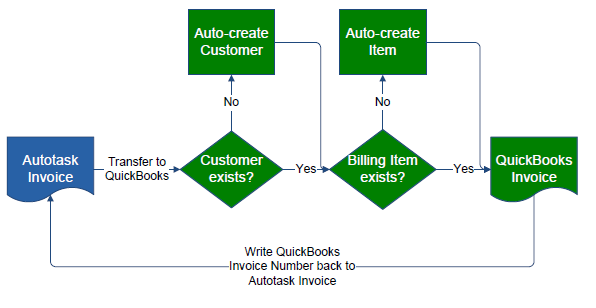
During the invoice transfer, the QuickBooks extension does the following:
- It matches Autotask organization names to QuickBooks customer (not company) names. If a QuickBooks customer name exactly matches the Autotask organization name, the invoice is transferred to the existing customer. The only fields compared are the name fields; address fields are not considered.
If no exact match is found, the web connector will create a new QuickBooks customer (not company) record.
TIP For information on how to export the QuickBooks customer list to Autotask to avoid creating duplicate companies, refer to Importing QuickBooks customer records into Autotask.
NOTE If you change the name of an organization in Autotask after the organization is mapped to a QuickBooks customer record, you must reset the QuickBooks mapping. Use the Reset QuickBooks Organization Mapping option, located on the Tools menu on the Organization page to clear the QuickBooks ID from the Autotask organization record. The next time invoices from this organization are transferred to QuickBooks, Autotask automatically resets the mapping and, if needed, creates a new QuickBooks customer record.
- It generates QuickBooks item names from specific Autotask fields and matches them to items on the QuickBooks Item List. If an exact match does not exist, it creates a new item in QuickBooks.
NOTE For subsequent transfers, QuickBooks tax and General Ledger Account settings on items are respected.
Configuration tasks
Before your first invoice transfer, do the following:
Customer records:
- If you are new to Autotask, but are an existing QuickBooks user and your customer list already exists in QuickBooks, import your customer list into Autotask. Refer to Importing QuickBooks customer records into Autotask.
- If you are new to QuickBooks, but are an existing Autotask user and your customer list already exists in Autotask, no specific setup is required. Customer records are transferred to QuickBooks as you transfer invoices. If your Autotask instance contains parent/sub-organization relationships, refer to Parent/sub-organization and job-level invoicing.
IMPORTANT There is a limit of 41 characters for organization names in QuickBooks. Longer organization names transferred from Autotask will be truncated.
- To meet the billing requirements of specific customers, customize invoice settings by organization. Refer to Configuring invoice settings for QuickBooks Desktop.
- For information on how Autotask organization and invoice fields are mapped to QuickBooks, refer to Invoice field map.
Invoices:
- Run the web connector to make sure that QuickBooks financial accounts and vendors are synced to Autotask and available for mapping. Refer to Adding or editing a single or first web connector.
- Review the invoice templates that will be used for the invoice transfer to QuickBooks, so your invoices display the data you want to transfer. Refer to Invoice template setup for transfer to QuickBooks.
- Decide where you will calculate taxes: in Autotask or QuickBooks. Refer to Calculating taxes in Autotask instead of QuickBooks? (US versions only).
- If you are using classes in QuickBooks, you must determine how lines of business will map to them. Refer to Mapping lines of business to QuickBooks classes.
- Set up Autotask billing items so they are correctly mapped or created in the QuickBooks Item List.
- Map Autotask billing codes to QuickBooks financial accounts. Refer to Mapping billing codes to QuickBooks financial accounts.
- To determine the names of billing items Autotask will map to or create in QuickBooks, refer to Managing Naming Conventions.
- If you are new to Autotask, but have all billing items set up in QuickBooks and would like to keep your exact setup, refer to Populating Autotask lists with QuickBooks items.
- For information about how to deal with different levels on the QuickBooks Item List, refer to Using the tilde for mapping sub-items.
For information about initiating an invoice transfer, refer to Initiating invoice transfers.


