Smart Accounting Hub for QuickBooks Online (QBO)
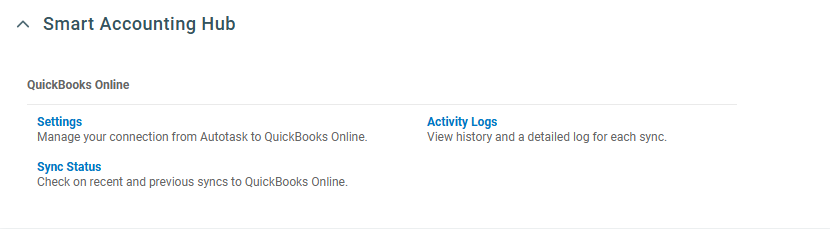
NAVIGATION Left Navigation Menu > Admin > Extensions & Integrations > Smart Accounting Hub
Overview
The Smart Accounting Hub for QuickBooks Online is an API connector that is built, maintained, and supported directly by Kaseya. This hub offers improved syncing performance, a modernized UI, better support response, and ongoing feature development based on your feedback.
Feature set
| Improved features | New features | Upcoming features |
|---|---|---|
|
|
|
-
It is strongly recommended that you make a backup of your existing QuickBooks Online Advanced Company data before migrating to the Smart Accounting Hub. Refer to Backing up your QuickBooks Online Advanced Company for more information.
-
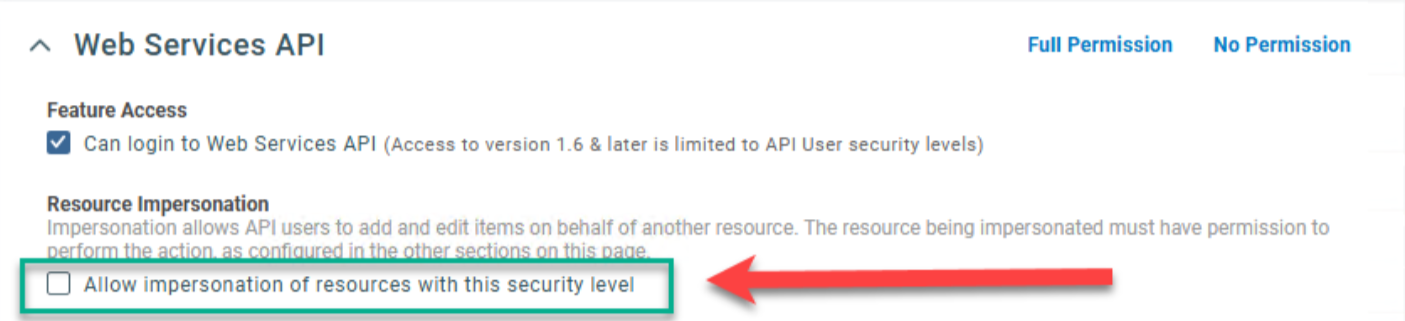
Copy of a System Administrator security level that allows API resource impersonation. Refer to Resource Impersonation for more information. Access to the Smart Accounting Hub is limited to users with impersonation permissions.
NOTE System security levels that restrict API resource impersonation may result in errors due to conflicts with the OAuth authentication flow.
-
Disconnect your current Autotask QuickBooks Online Integration. It is recommended to pause all automatic syncing capabilities from within the legacy QuickBooks Online integration. Refer to Disconnecting the current Autotask/QuickBooks Online integration for more information.
-
We currently support QuickBooks Online Plus and QuickBooks Online Advanced.
-
Smart Accounting Hub for QuickBooks Online is available to customers in all supported QuickBooks Online countries. Full support is currently provided in the United States, Canada, and the United Kingdom (English only), where the integration has been fully tested.
-
For customers in Australia and other regions, the Smart Accounting Hub is available with limited support due to region-specific differences in Intuit’s platform during development and testing. While the integration is expected to function, some regional behaviors may vary.
-
IMPORTANT Support for the legacy Autotask QuickBooks Online Integration has been extended through August 30, 2026. The integration will remain accessible until September 30, 2026, after which access will be discontinued.
-
Security permissions. Refer to the Security and navigation section above.
Save a backup of your company so you always have a copy of your chart of accounts. You can also undo unwanted changes to vendors, customers, settings, and other data if you need to. For more information about what data is included or not included during a backup, refer to Back up and restore your QuickBooks Online Advanced Company. The backup feature is available only for QuickBooks Online Advanced plans.
To manually backup your QuickBooks Online data:
-
Go to Settings ⚙.
-
Select Back up company.
NOTE You might need to sign in with your Intuit account, then select Authorize to proceed.
-
Select Add Company.
-
Select the Search for a company ▼ drop-down menu, then select the company you want to back up.
-
Select Next, then Connect.
NOTE If you have multiple companies to back up, repeat steps 2 through 4.
-
Find the company you want to back up.
-
Select the Action ▼ drop-down menu, then select Run full backup.
-
Save your backup in a safe and accessible location or folder.
Pausing the automatic sync between Autotask and QuickBooks Online helps preserve your existing integration settings while you set up the new Smart Accounting Hub. This makes it easy to switch back to your current setup at any time, if needed.
Disconnecting the current integration will erase all of your existing integration settings and will require you to reconfigure all settings.
IMPORTANT To avoid data conflicts, duplicates, and potential irreparable errors, it's critical that automatic sync is enabled in only one integration at a time. Before turning on automatic sync in the Smart Accounting Hub or your current integration, please ensure it is fully turned off in the other. This step is essential to maintain data accuracy and system stability.
To pause the automatic invoice sync:
-
In the navigation bar of the integration application, click Apps.
-
From the Autotask Invoices app, click the Action drop-down menu and select Settings.
-
On the Connection settings and logs page, click Change.
-
In the Invoice sync statusfield, select Do not sync invoices.
-
Click Save at the bottom of the page.
To pause the automatic purchase order sync:
-
In the navigation bar of the integration application, click Apps.
-
From the Autotask Purchase Order app, click the Action drop-down menu and select Settings.
-
On the Connection settings and logs page, click Settings.
-
In the Number of days in the past to look for unsynced POs field, enter 0.
-
Click Save at the bottom of the page.
To pause the automatic expense report sync:
-
In the navigation bar of the integration application, click Apps.
-
From the Autotask Expense Sync app, click the Action drop-down menu and select Settings.
-
On the Connection settings and logs page, click Change.
-
Select the checkbox for Pause automatic sync of Expense Reports.
-
Click Save at the bottom of the page.
IMPORTANT When disconnecting the current QuickBooks Online integration, all settings are erased. Be sure to take a screenshot of your current settings so that you can easily reconfigure them in the Smart Accounting Hub.
To disconnect the Autotask app in QuickBooks Online:
-
Navigate to the left side menu and click Apps.
-
Using the ellipse menu for the Autotask Invoices or Autotask Expense Sync app, click Disconnect.
IMPORTANT Before logging in to the Smart Accounting Hub, be sure all users are assigned to a copy of the System Administrator security level and that resource impersonation is allowed. Refer to the Prerequisites section above.
Step 1: Log in to the Smart Accounting Hub
-
To open the page, navigate to the Left Navigation Menu > Admin > Extensions & Integrations > Smart Accounting Hub.
-
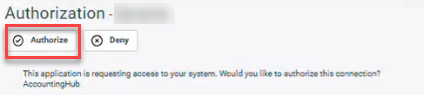
Click Settings, Sync Status, or Activity Logs to open the Authorization page.
-
Click Authorize to allow the Smart Accounting Hub access to your Autotask instance.
-
Once authorization is granted, you will be successfully logged into the Smart Accounting Hub.
NOTE If a user logs out or the session expires, the Smart Accounting Hub connection to Autotask must be reauthorized for security purposes before access can be restored.
Step 2: Connect your QuickBooks Online instance
-
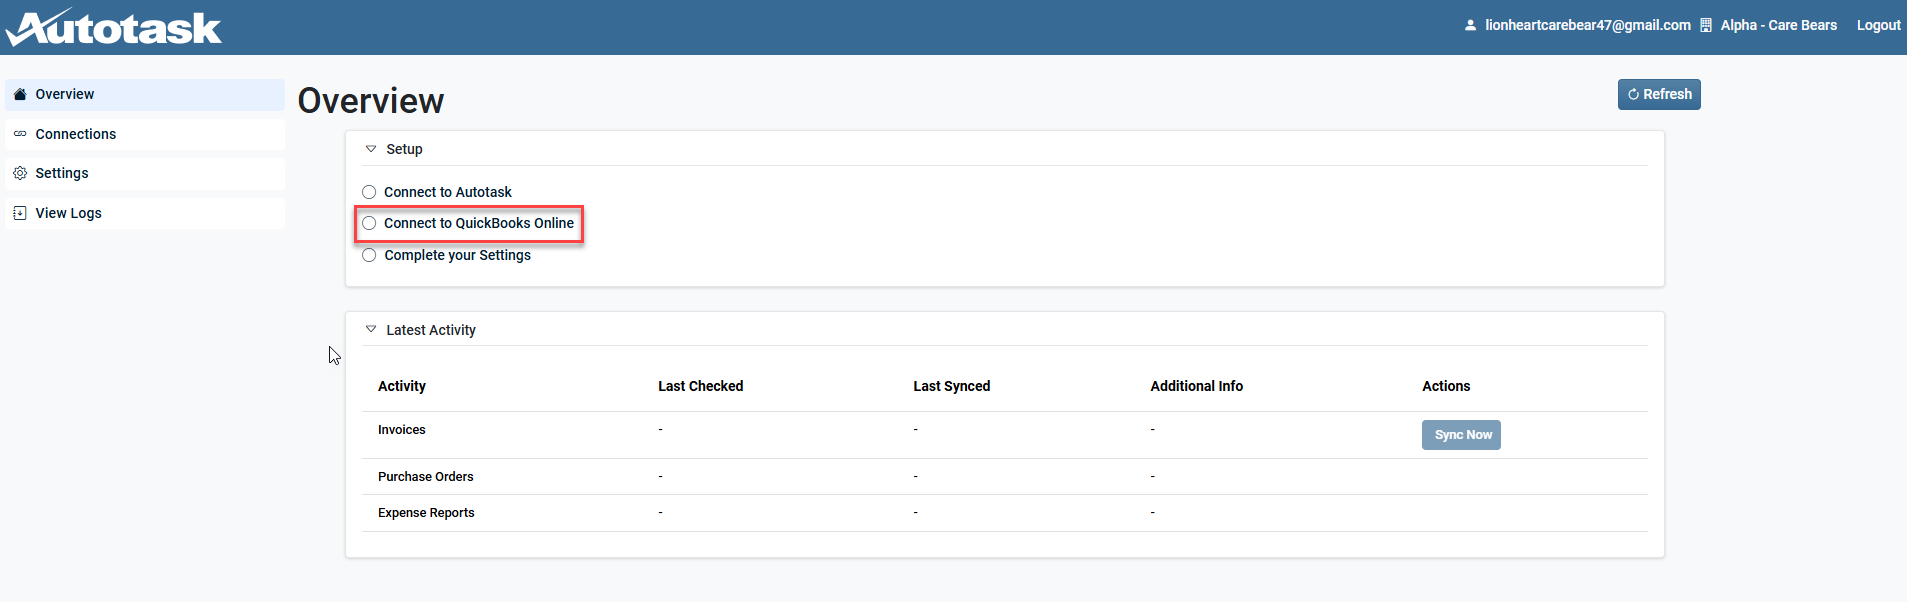
From the left side menu in the Smart Accounting Hub, click Overview.
-
In the Setupsection, select Connect to QuickBooks Online.
-
In the QuickBooks Online section, click Connect.
-
Enter your QuickBooks Online account email address or user ID.
-
Click Sign In to verify the account information.
-
After verification is complete, click Save.
-
Refresh the page to confirm the connection has been successfully completed.


