Adding, editing, and copying workflow rules
PERMISSIONS Security level with Admin permission to configure Workflow Rules. For Service Desk workflow rules only, Admin permission to configure Service Desk (Tickets). Refer to Admin security settings.
NAVIGATION Left Navigation Menu > Admin > Admin Categories > Automation > Workflow Rules > Workflow Rules
BEFORE YOU BEGIN Before you add your first workflow rule, read the following topic: Autotask workflow rules.
Best practice approach to setting up workflow rules
Workflow rules are intended to model and describe your local organization's processes. As is the case with all automation, they will improve good workflows and make bad ones worse.
Before you create any workflow rules, you should do the following:
- Create a flowchart of the workflow your workflow rule is going to automate. You can link this document to the workflow rule. Refer to Documentation URL.
- Save the flowchart, and if you make changes, update the flowchart and then update the workflow rule.
- Save the name and file location of the flowchart in the Description field of the workflow rule. This preserves the connection between the two, and makes it clear which workflow rules must be updated as your processes change.
Here is an example:
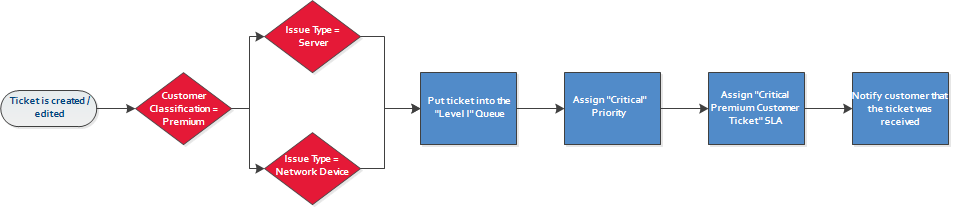
The corresponding workflow rule that automates the processes (shown above in blue) looks like this:
| Workflow Rule Name | Entity | Events | Conditions | Actions |
|---|---|---|---|---|
| Critical Ticket Premium Customer | Ticket | When a Ticket is Created, Edited | And the following conditions are met:
Issue in list "Server OR Network Device" Organization Classification equal to "Premium" |
Then execute the following actions:
Assign To Queue "Level I" Set Priority To "Critical" Set Service Level Agreement As "Premium SLA" Send notification e-mail (Ticket - Created or Edited) to Primary Organization Contact |
TIP Avoid creating workflow rules only for notification purposes, especially if you are notifying internal resources. Dashboard widgets are a much better alternative. Refer to Introduction to the Autotask dashboard.
Adding, editing, or copying a workflow rule
To add, edit, or copy a workflow rule, do the following:
- To open the page, use the path(s) in the Security and navigation section above.
- Select the tab that corresponds to the entity the workflow rule will act on.
Tabs and entities
Workflow Rule Tab Available Entities CRM Opportunity
Sales Order
Quote
DeviceContract Contract Projects Project
TaskService Desk Ticket
- To create a new workflow rule, click New.
- To edit or copy an existing workflow rule, hover over the context menu, and select Edit Workflow Rule or Copy Workflow Rule.
The Workflow Rule page opens.
- Complete or edit the General and Notification tabs.
- Click Save & Close.
IMPORTANT Workflow rules are not constrained by ticket category settings. They can update a field to a value that is specifically excluded by the ticket category.
General tab
On the General tab, you enter or edit basic information and configure the following:
- The entity the workflow rule will act on
- The events and conditions that will trigger the rule
- The timeframe for any time-sensitive behavior
- The updates to the entity and any actions that will be performed when it is triggered
- Any to-dos that will be created
- Any ticket notes that will be created
- Any tickets that will be created

| Field | Description |
|---|---|
| Workflow Rule Name |
Enter a unique workflow rule name. |
| Active | The Active check box is selected by default, and the workflow rule will go into effect as soon as you save it. Inactive rules will not fire. |
| Description | Describe in some detail what the workflow rule will do. This field can be added to the workflow rules table from the column chooser. |
| Documentation URL | Enter a link to a document with text or diagrams that explain how this workflow rule works in your local organization's process. Click the |
The Events section lists the events, by category, that you can trigger and/or update on. The ticket entity options are shown in the screenshot below. These events also appear as a column on the workflow rules page to indicate the event category to which the rule pertains. Since you can sort these columns, you'll be able to see all of your rules that affect a certain event like creating and editing, for example.

- If you are creating a CRM or Projects workflow rule, select the Entity to which the workflow rule should be applied.
- Then, select and define the events that will trigger the workflow rule. You can select one or multiple events, but Autotask will treat your selections as this OR that (... when a ticket is created OR when a ticket is edited...) rather than this AND that. The events you can select for triggering the rule are entity-specific, but there are three types:
| Event Type | Description | Examples |
|---|---|---|
| Regular Event (immediate event) | Regular events only have a check box, and there is nothing else to select. | Service Call Scheduled Created |
| Events where you are able to specify a type of resource (immediate event) | With this type of event, you can further define the type of actor who will trigger the event. You will see the following: • Anyone (default) • Autotask Resource • External Contact (everyone who is not an Autotask Resource, for example an Organization Contact) • Client Portal User • Client Portal or Taskfire User • Co-managing User • Taskfire User Not all options are available for all entities. |
Created by Note Added by |
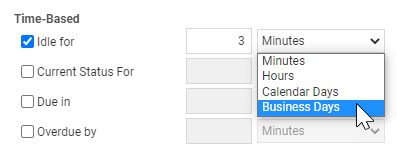
| Time-based events |
Time-based events are followed by a time frame selector. You enter a time value and select a time frame. The workflow rule is triggered when the event is the specified amount of time in the future (Due in, Expiring SSL Certificate In, or in the past Overdue by, Past Warranty Expiration by. Also refer to Events where the time component is based on business days. |
Due in SLA: Resolution Overdue by Idle for |
|
Service Level Agreement (SLA) events |
SLA events are similar to time-based events, but they have two additional time frame selections, SLA Minutes, and SLA Hours. The difference between Hours and SLA Hours when configuring a workflow rule is that SLA hours can be customized. For more on configuring custom hours for your Service Level Agreements, refer toDefine SLA objectives and Configure custom hours for the SLA. |
SLA Minutes |
NOTE SLA and Change Approval events will only trigger a workflow rule if those features are enabled. Refer to Introduction to service level management and Change management for more information.
Events where the time component is based on business days
Business days are associated with locations. On a ticket, both resources and queues are associated with locations, so the question is which location should be used by the workflow rule.
For tickets, if the time frame of an event with a time component is Business Days, the workflow rule logic for tickets works like this:
- If the entity has a primary resource, business days will be calculated based on the primary location of the primary resource. The primary location is a setting on the New Resource and Edit Resource pages. Refer to Adding, editing, or copying a resource.
- If the entity has no primary resource but has a queue, business days will be calculated based on the queue's internal location. The internal location of the queue is a setting on the New Queue and Edit Queue pages. Refer to Add or edit a queue.
- If the entity has neither a primary resource nor a queue, business days will be calculated based on your organization's default internal location. Refer to Internal locations.
For all other workflow entities (projects, task, contracts, etc), the time component is based solely on the business hours of the default location.
About events that can trigger other events
Regular events and events where you select a dynamic recipient (immediate events) can cause an entire workflow cascade. If the workflow rule is processed and results in a change to the entity that makes it match the conditions for another workflow rule, that workflow rule is also triggered. This process can repeat up to five times. Refer to What triggers a workflow rule?.
Conditions allow you to fine-tune the circumstances that will trigger the workflow rule. You don't have to select a condition. If you don't, the workflow rule will fire every time the event occurs. Conditions are organized in the drop-down lists by entity:
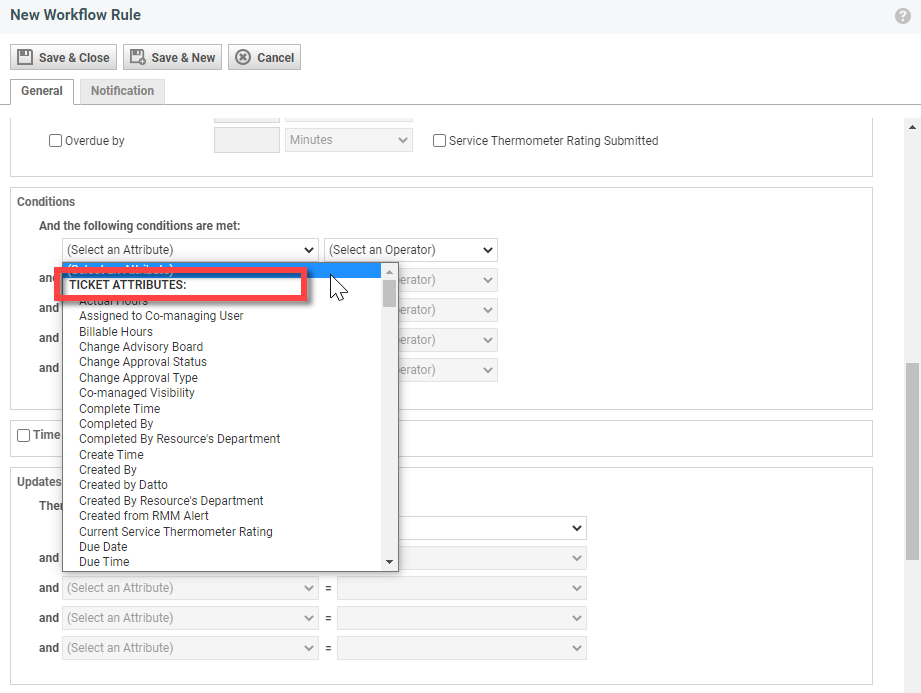
NOTE You can create up to five conditions. There is an AND relationship between conditions, so your workflow rule will only be triggered when all the conditions you create are met.
To create conditions, do the following:
- Select an Attribute. Attributes are fields of the selected entity or a related entity. You can select them from a drop-down menu.
TIP The Conditions list of attributes includes your local organization's user-defined fields. Refer to User-Defined Fields (UDFs) in workflow rules.
- Select an Operator from the drop-down menu. Operators are specific to the Attribute you selected in the previous step.
- For most conditions, you must also enter a Value or select one or multiple values. Multiple values can only be selected for specific operators, such as In List.
The type of workflow rule you're creating determines what options are available. For a full list of all available selections for each type of workflow rule (ticket, opportunity, sales order, device, contract, task, or project), refer to Workflow rule attributes, operators, and field types.
Important considerations:
IMPORTANT Do not use the Changed, Changed to, and Changed from operators with future events; if you do, the workflow rule will not fire. Future Events include Idle for, Due in, Overdue by, and all of the SLA Events.
IMPORTANT Changed, Changed to, and Changed from operators are not available for user-defined fields because UDF values are not tracked in the change-tracking history.
IMPORTANT Also note that workflow rules will not restart the Idle clock. If a workflow rule changes the status to be complete01 when the ticket is idle for two business days, it will not change the Idle count back to zero. This means that if you have another workflow rule set to change the ticket from complete01 to complete if the ticket is idle for five minutes, this rule will not fire. You need to set the idle time to two days and five minutes instead.
IMPORTANT The events Idle for, Due in, Overdue by, and Current Status for are not valid when the condition Status is equal to Complete.
The Time-Sensitive section allows you to limit when the workflow rule will be triggered. This is great for creating different workflow rules for business hours and after hours, or assigning a ticket to a team in another time zone if you have a follow-the-sun support model.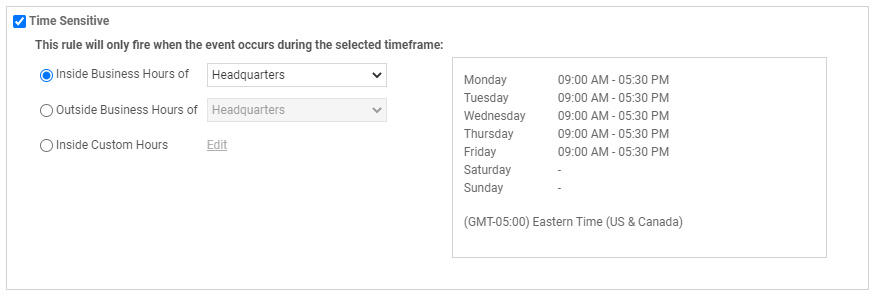
- Click the Time-Sensitive check box to expand this section.
- Use the radio buttons to select a timeframe from the following options:
| Selected Timeframe | Description |
|---|---|
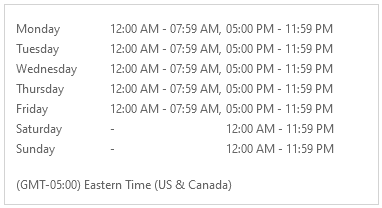
| Inside Business Hours of [internal location] |
If you select this radio button, the business hours of the selected internal location are displayed, and the workflow rule will fire during those hours only. To change the internal location, select a different one from the drop-down menu. The current business hours will be refreshed with the new internal location's business hours. |
|
Outside Business Hours of [internal location] |
If you select this radio button, the hours outside of the business hours of the selected internal location are displayed, and the workflow rule will fire during those hours only. |
|
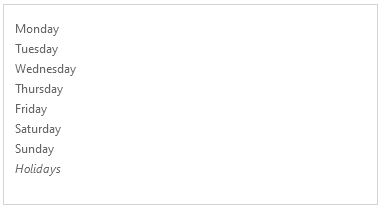
Inside Custom Hours |
If you select this radio button, you can freely define when the workflow rule should fire, regardless of whether the selected days are business days, weekend days, or holidays. You are not referring to a predefined work week.
EXAMPLE If you want to offer support hours on holidays no matter if they fall on a regular business day or on a weekend day, enter the Business Hours Start and Business Hours End times, and select the appropriate holiday set. If Christmas is a holiday, these hours will apply whether it falls on a Wednesday or a Sunday. |


- Click OK.
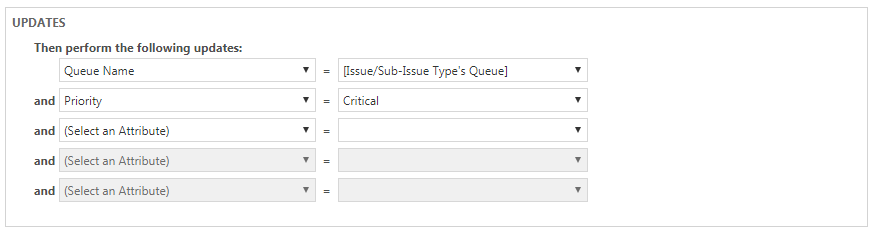
In the Updates area, specify what changes the rule will make to the entity (opportunity, sales order, device, contract, ticket, task, or project) when the conditions are met and the workflow rule is triggered.
You can configure up to five updates.
IMPORTANT Like conditions, updates have an and relationship. When the workflow rule is triggered, all the updates will be performed automatically. Updates are also categorized by entity in the drop-down lists.
IMPORTANT Changing the Ticket Category or Ticket Type on an existing ticket—whether manually or via a Workflow Rule—does not automatically apply the default values associated with that category or type. To ensure the correct fields are populated, values must be explicitly set either in the Workflow Rule’s Updates section or manually on the ticket after the rule runs. This is especially important for Change Management tickets, as assigning a Change Management Category or Type does not automatically populate fields such as Change Advisory Board or Change Approval Type.
- Select an Attribute, that is, an entity field you want to change.
TIP The Updates list of attributes includes your local organization's user-defined fields. Refer to User-Defined Fields (UDFs) in workflow rules.
- Then select or enter a value, or select a dynamic option.
| Option | Description |
|---|---|
| Select a value from a drop-down menu | A drop-down menu will appear when the attribute field is associated with a list of options, and you must choose one of the values configured for the field. An example is the Priority field. |
| Enter a value | You can enter a value for fields where you do not have to select from a list of pre-configured options. An example is the Estimated Hours field. |
| Dynamic option | Some fields, like Queue Name or Primary Resource/Role, have one or more dynamic options. These are surrounded by square brackets and listed at the top of the list. These options depend on designations you have made elsewhere in Autotask. They require that you select resources to fill the following roles everywhere in Autotask: • Account Manager • Account Team • Department Lead • Timesheet Approver • Queue Owner • Queue Resources The Queue Name field can also be updated to the [Issue/Sub-Issue Type's Queue], an association that is created when you set up Issue Types. Refer to Adding issue types and sub-issue types. |

This area allows you to tell Autotask to automatically perform certain actions when the workflow rule is triggered. It is only available for ticket, task, and opportunity workflow rules. To include an action to the workflow rule, select a value and/or check box.
| Action | Description |
|---|---|
| Opportunity Workflow Rules | |
| Then release product / inventory reservations | If you have reserved inventory items in anticipation of winning an opportunity that you ended up losing, you can automatically release them using this setting. |
| Ticket Workflow Rules | |
| Then send survey to ticket contact: | Click the drop-down menu and select the survey that will automatically be sent to the Ticket Contact when the workflow rule fires. |
| Then transfer ticket to: | Click the drop-down menu and select one of the following:
|
| Then Execute Extension Callout: | Select the Extension Callout you want to execute. Extension callouts provide data for automatic (round-trip) ticket closure for third-party Remote Monitoring and Management (RMM) application integrations. They store authentication and format information provided by the remote monitoring application service provider. The Autotask Web Services API uses that information to send data directly to the remote monitoring application. Refer to Extension Callout (Tickets) |
| Then add items from the following checklist to the ticket’s checklist: | Click the drop-down menu and select the checklist you would like to add to the ticket. The checklist will be appended to any checklist items that are already on the ticket's checklist. If the addition of a library checklist would cause the ticket checklist to exceed 40 items, the checklist will not be added. Either way, a note will be added to the ticket to indicate that the addition was successful or unsuccessful. If a ticket category change via workflow rule will cause checklist items to be added via the category AND a workflow action, the category items will be added first, followed by the items from the workflow action. IMPORTANT Workflow rules override ticket category settings and any restrictions imposed by the ticket creator's security level, so they can add a checklist to a category of ticket that the user normally might not be able to. |
| Add Ticket to Primary Resource’s Work List | Adds the ticket to the Primary Resource's work list, unless the work list already contains the maximum number of tickets. TIP If you've enabled the Ticket Added to Work List Event, you can check the Work List Owner box in the Recipients section of the Notification tab to alert the owner of the addition of the ticket to their Work List. |
| Task Workflow Rules | |
| Then set status of successor tasks to (Complete tasks will not be updated): | Select a Task Status from the drop-down menu. This will update the status of all successor tasks to the selected status. Example: Change the successor task status from New to Ready to Schedule. |
| Add Task to Primary Resource’s Work List | Adds the task to the Primary Resource's work list, unless the work list already contains the maximum number of tasks. TIP If you've enabled the Ticket Added to Work List Event, you can check the Work List Owner box in the Recipients section of the Notification tab to alert the owner of the addition of the ticket to their Work List. |
NOTE Workflow rules cannot override business logic. Example: workflow rules cannot change the category of a domain or SSL certificate device. In cases where a workflow rule fires but the actions did not occur, a note will be added to the Activity feed.
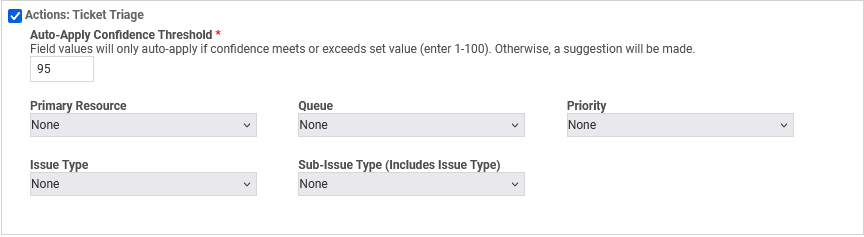
Use this action to send tickets to Ticket Triage so that AI can suggest or automatically update selected ticket fields, and optionally assist with ticket assignment. This action is available for Service Desk workflow rules.
When the rule runs, Ticket Triage will evaluate the ticket and:
-
Apply suggestions automatically (for fields configured for auto-update and meeting the confidence threshold), and/or
-
Display suggestions in the ticket’s Ticket Triage panel for users to review and apply.
Fields to manage
Select the ticket fields that Ticket Triage is allowed to suggest or update. Depending on your Kaseya Intelligence configuration, you can enable fields such as:
-
Priority
-
Issue Type
-
Sub-Issue Type
-
Primary Resource
-
Queue
Action mode
Choose how Ticket Triage will behave when this action runs:
-
Suggest only
Ticket Triage analyzes the ticket and proposes values for the selected fields.The suggestions are displayed in the Ticket Triage panel on the ticket, and users choose whether to apply them.
-
Auto-apply fields
Ticket Triage analyzes the ticket and automatically updates the selected fields when the AI confidence meets or exceeds the configured threshold.
Refer to How Ticket Triage uses workflow rules for more information.
Confidence threshold
Specify the minimum AI confidence level required before Ticket Triage can automatically update a field.
-
If the calculated confidence for a field is below this threshold, that field will not be auto-updated by this action.
-
Suggestions can still be shown to users.
NOTE Changes made by Ticket Triage are recorded in the ticket’s history.
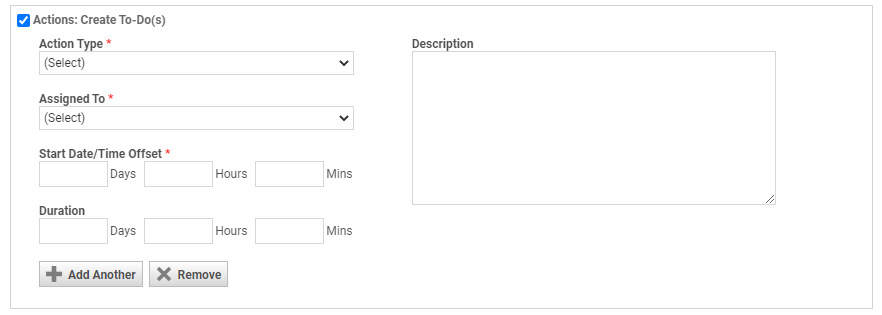
All types of workflow rules allow you to create up to ten CRM to-dos and assign them to resources with CRM permissions. Some types allow you to assign to-dos to a variety of dynamic recipients:
| Role-Based Recipient | Opportunity | Sales Order | Project | Task | Ticket |
|---|---|---|---|---|---|
| Account Manager | |||||
| Initiating Resource | |||||
| Ticket Primary Resource | |||||
| Outsourced By | |||||
| Project Lead | |||||
| Opportunity Owner | |||||
| Sales Order Owner |
NOTE For Ticket workflow rules: Not all tickets have a primary resource assigned (for example, tickets assigned to a queue). If you assign the to-dos to the primary resource and the workflow rule is triggered by a ticket that doesn't have a primary resource, the to-do will be assigned to the account manager of the ticket's account.
For information on creating a to-do, refer to Adding or editing To-dos.
NOTE Device and Contract workflow rules do not feature dynamic recipients.
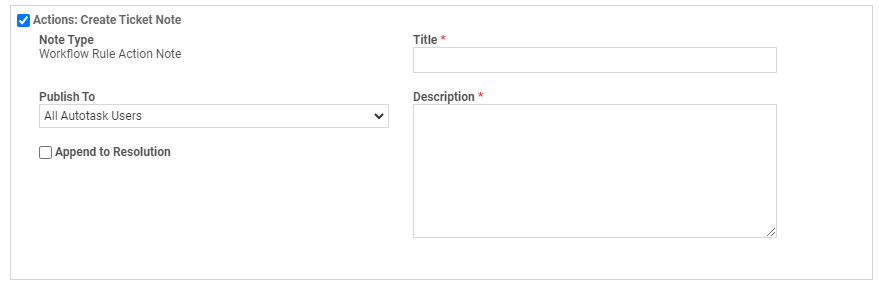
Workflow rules created on the Service Desk tab have an additional section which allows you to add a read-only note to tickets affected by the workflow rule. The creation of this note is not considered an activity by the workflow rule engine. It will not trigger the firing of additional workflow rules, and it will not update the Last Activity field for the ticket.
NOTE Notes created in this way cannot be edited or deleted, but they are not considered System Notes when showing or hiding system notes on the Ticket page.
| Field | Description |
|---|---|
| Note Type | The Note Type will be set to Workflow Rule Action Note, which can be used as a filter in the Global Notes Search. Refer to Note types and Running a global notes search. |
| Publish |
The Publish type determines who can view notes or open attachments created by a resource (system notes visibility is determined by the viewer's security level). It is either inherited from the note type (but can be edited), or selected outright from the Publish To dropdown menu. The following options are available:
Attachments without a Publish To selector inherit the visibility of the parent entity. EXAMPLE When you add an attachment while editing a ticket note, the ticket note's Publish To option is applied to the attachment. |
| Append to Resolution | When you select this check box, the contents of the Description field are appended to the text in the Resolution field on the ticket page. This action is not considered an activity by the workflow rule engine and will not trigger the firing of additional workflow rules. |
| Title | The title will be displayed in the Notes / Summary column of the Time Entry and Notes section on the Ticket page. |
| Description | Enter the text of the note here. Notes can have up to 32,000 characters. |

Workflow rules created on the CRM, Contract, or Projects tab have an additional section which allows you to create a ticket when the workflow rule conditions are met. Tickets cannot be created from Service Desk workflow rules.
To apply this section:
- Select the Action: Create Ticket(s) check box.
- Select the appropriate Ticket Category. All active ticket categories will appear in the list. Ticket categories can supply default ticket titles, checklists, and more. You can add a new ticket category for use with this workflow rule or use an existing one. For more information, refer to Adding and editing categories.
- If you want the workflow rule to create an additional ticket, select Add Another. You can have up to three tickets created by a workflow rule.
When the ticket is created, the following will occur:
- The ticket or tickets are created using the selected ticket category. If the ticket category does not supply a ticket title, the following title will be applied: "Ticket created from Workflow Rule: Workflow Rule name".
- Where possible, the initiating entity is applied to the ticket (for example, if a contract triggered the contract workflow rule then that contract will appear in the ticket's contract field, if an opportunity triggered the workflow rule then that opportunity will appear in the ticket's opportunity field, etc.). This linking will occur even if the field is not visible on the selected ticket category.
- A note is added to the ticket's Activity tab with the name of the workflow rule, what entity triggered it, and who was the initiating resource. You do not have to select Show System Notes to see this note.
- The ticket is processed by the workflow rules engine and will trigger any additional workflow rules that are based on ticket creation.
NOTE This feature can be used to replace the manual selection for ticket creation at the end of the New Contract Wizard and Won Opportunity Wizard.
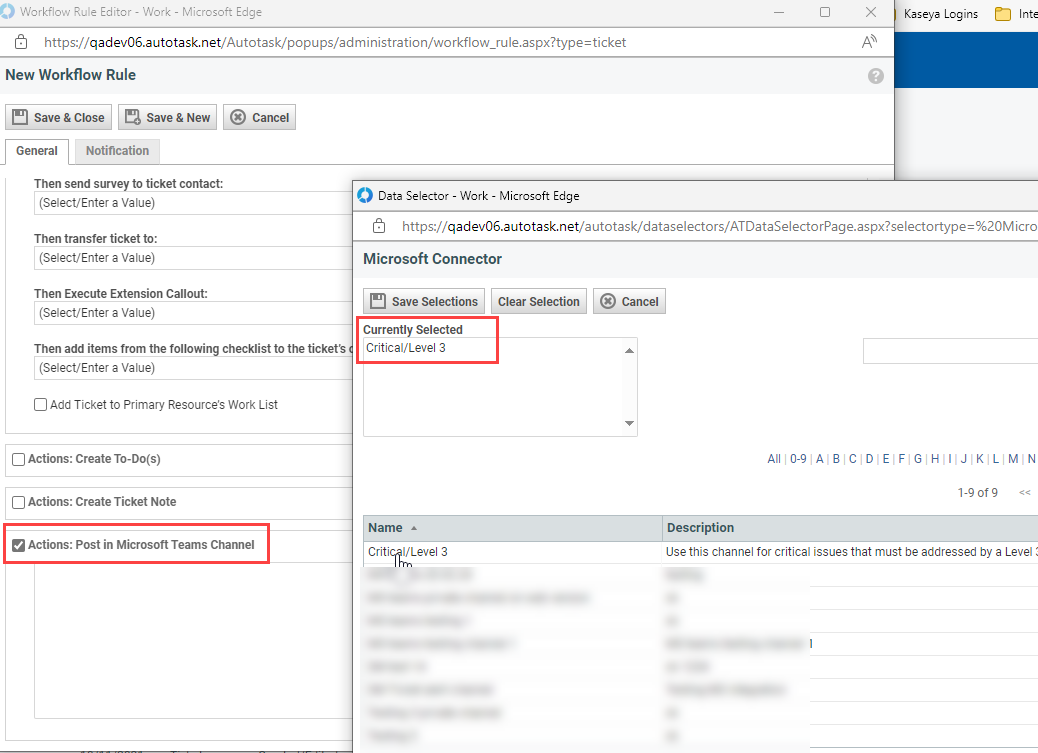
The Autotask integration with Microsoft Teams provides users with an alternate method for receiving the notifications generated by ticket workflow rules. Instead of a mailbox, the notification is sent to a webhook URL and posted in a Teams channel. The workflow rules define the events and conditions and determine the Teams channel or channels the notification is posted to. For more on the Autotask integration with Microsoft Teams, refer to The Microsoft Teams integration.
In this section, you configure the specific channels that will receive the post. Do the following:
- Set up the connectors to the Microsoft Teams channels in Autotask. Refer to Creating and managing Teams channel connectors.
- Click the selector icon to the right of the channel list.
- Click on a channel to add it to your selection.
- Click Save. Notifications will be posted to all selected channels.
NOTE A workflow can only post to a maximum of 10 channels. Multiple workflow rules can post to the same Teams channel.
Notification tab
On the Notification tab, you determine the following:
- Who receives an email notification
- What the notification email looks like
- If and how often it will be repeated
- Who will appear as the sender of the email
- Whether the notification content will be added to the entity as a note
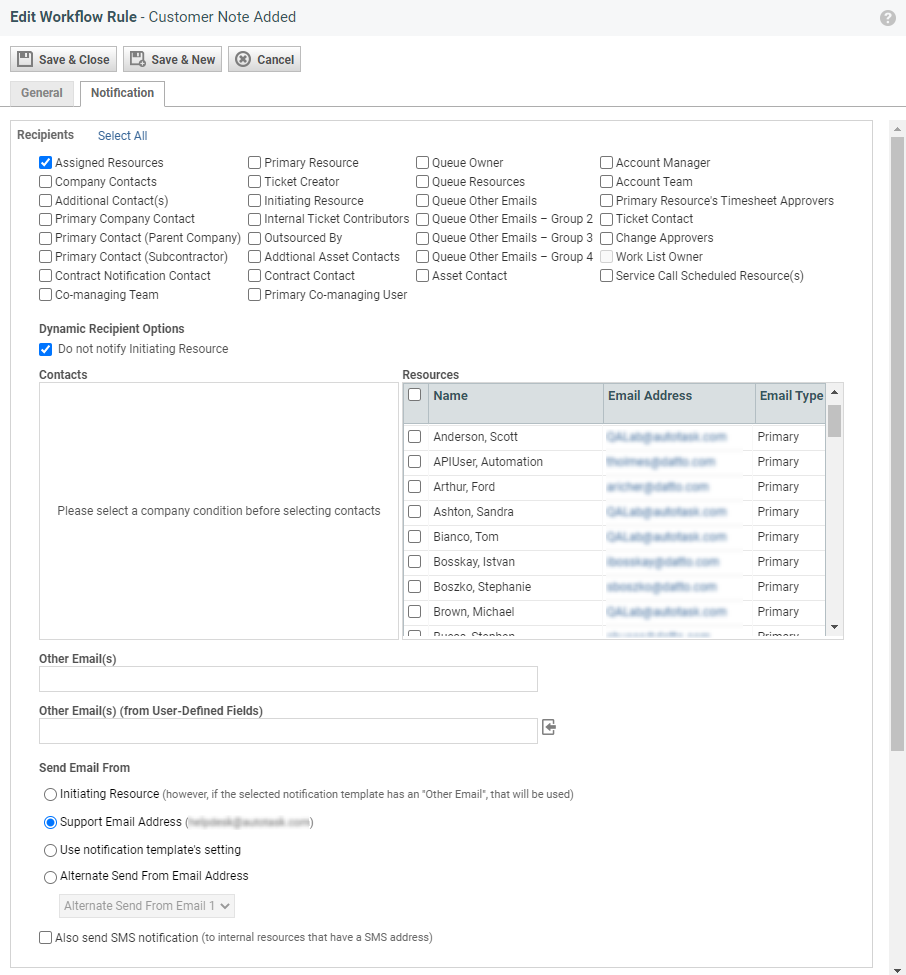
In this section, you'll decide who will be notified when the workflow rule is triggered and who will appear as the sender. The options available in the top portion of the Recipients area depend on what type of workflow rule (ticket, project, opportunity, etc.) you are creating.
| Recipient Type | Description | |||||||||||||||||||||||||||||||||||||||||||||||||
|---|---|---|---|---|---|---|---|---|---|---|---|---|---|---|---|---|---|---|---|---|---|---|---|---|---|---|---|---|---|---|---|---|---|---|---|---|---|---|---|---|---|---|---|---|---|---|---|---|---|---|
| Select All | To select all dynamic recipients, click Select All. NOTE Caution: Consider carefully if all these recipients really need to receive a notification email. Also, you cannot clear them all at once; you must clear each box individually. |
|||||||||||||||||||||||||||||||||||||||||||||||||
| Recipients | Select role-based recipients as appropriate. Role-based recipients can be internal resources or customer contacts. When you select a role-based recipient, the system will figure out who the right resource is when the workflow rule is triggered. For definitions of role-based recipients, refer to Role-based notification recipients. EXAMPLE If you select Project Lead, the project lead for the specific project or task that causes the workflow rule to fire will receive a notification. NOTE The email addresses of all users who receive the notification are appended to the role name. |
|||||||||||||||||||||||||||||||||||||||||||||||||
| Dynamic Recipient Options | Select Do not notify initiating resource to prevent the initiating resource from receiving a notification that they would otherwise receive based on the dynamic recipient selections for this workflow rule. EXAMPLE A workflow rule is set to fire when a ticket is edited and includes a notification to the primary resource. With this setting selected, if the primary resource is the resource who edits the ticket, they will not be notified by this workflow rule. |
|||||||||||||||||||||||||||||||||||||||||||||||||
| Contacts (option) | With this option selected, when the workflow rule fires, all of the contacts at the associated organization will receive a notification. | |||||||||||||||||||||||||||||||||||||||||||||||||
|
Contacts (table) |
If one of your Conditions section for the workflow rule is the customer organization, this table will populate with organization contacts you can add as notification recipients. |
|||||||||||||||||||||||||||||||||||||||||||||||||
| Resources | To notify someone who is not a dynamic resource, you can also choose explicit recipients for notification from the list of your internal resources. | |||||||||||||||||||||||||||||||||||||||||||||||||
| Other Email(s) | Use the Other Email(s) box to enter email addresses that are not available for selection. Separate multiple addresses with a semi-colon or comma. |
|||||||||||||||||||||||||||||||||||||||||||||||||
| Other Email(s) (from User-Defined Fields) | If you have configured organization UDFs of type Email, click the insertion icon If a workflow rule is configured to fire off of internal notes and reference any email in this field, it will never fire. |
|||||||||||||||||||||||||||||||||||||||||||||||||
|
Resource Email Settings |
When selected, this option BCCs all internal recipients, including those in Other Email(s), on outbound notifications. |
|||||||||||||||||||||||||||||||||||||||||||||||||
|
Send Email From |
This field determines the email address that is used as the Sender address in the notification email. Choose the email address you would like to use as the outgoing sender. Depending on the context, the following options are available: IMPORTANT Replies to notification emails will come to the selected email address. Make sure that the mailboxes are watched or the emails are properly redirected.
Additionally, you can select to send an SMS notification to internal resources that have an SMS address. SMS addresses are listed as a type of email address on the resource setup page. Refer to Email Addresses. |
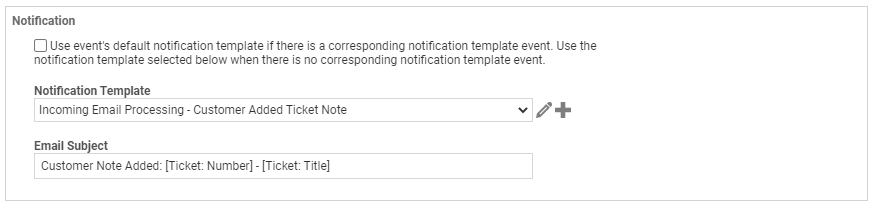
Every workflow rule that has one or more notification recipients must be associated with a notification template. You have two options for the template to use, or you can use them in combination.
| Field | Description |
|---|---|
| Use event's default notification template... | If you've selected an event (on the General tab) that is associated with a default notification template, and you want to use that template for that event, select the Use event's default notification template check box. |
| Notification Template | To use a specific template when this workflow rule fires, select it in the Notification Template field. Click the edit icon  to add a new template. Refer to Notification templates. to add a new template. Refer to Notification templates.NOTE If the check box above this field is also selected, and the workflow rule is triggered by an event that has a corresponding notification template event, the default template associated with that notification template event will be used for the notification. |
| Email Subject | You also have the option of entering your own email subject line, which will override the one in the notification template you've selected. |
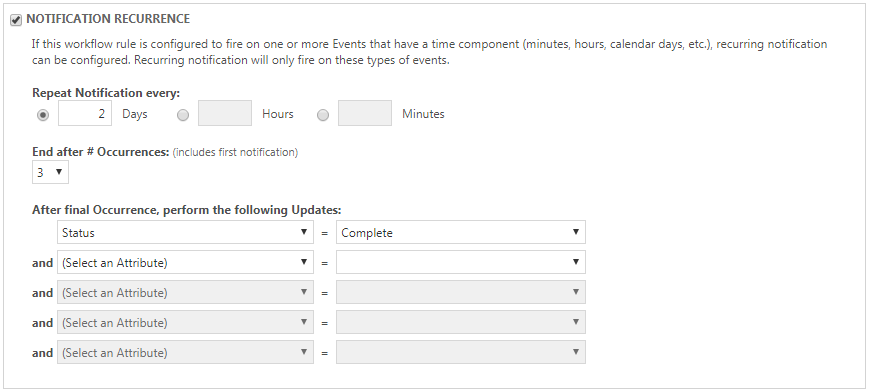
If your workflow rule is configured to fire on one or more Events section that have a time component (minutes, hours, calendar days, etc.), you can configure recurring notifications. Recurring notifications will only fire on events with time components, and notifications will stop as soon as the workflow rule conditions are no longer met, so customers will not get notifications after they have responded.
This feature is great for closing tickets when you are waiting for a customer response. You can send a notification saying that you consider the ticket complete, and it will close it unless you hear from the customer.
| Field | Description |
|---|---|
| Repeat Notification every: | Use the radio buttons and associated fields to set the frequency of notifications. |
| End after # Occurrences: (includes first notification) | Select the number of occurrences from a maximum of 10. |
| After final Occurrence, perform the following Updates: | After the last notification has been sent, you can optionally have the workflow rule perform a final set of updates. You will set these Updates section in exactly the same way as on the General tab. |
NOTE Notification recurrences will fire as long as the conditions of the workflow rule are met. If an action resets a time component, but the conditions are still met, the Notification Recurrence count will not be reset.
NOTE If the timeframe selected in the Events section is Business Days, recurring notifications will not be sent on non-business days but will resume on the next business day. The Business Hours selected in the Time-Sensitive section of the workflow rule will be applied.

When your workflow rule is triggered and a notification is sent, this option allows you to convert that notification into a note attached to the item. The note title will be Notification sent via Workflow Rule [name of workflow rule]. This will preserve the notification and its content in the entity record. This is particularly useful if you wish to create a permanent record of notifications sent to customers.
NOTE Notes created in this way cannot be edited or deleted, but they are not considered System Notes when showing or hiding system notes on the Ticket page.
To populate all required Note fields, you must specify the following:
- An Action Type for opportunity and sales order workflow rules
- A Note Type for contract, ticket, project, and task workflow rules
- A Publish option for ticket, project, and task workflow rules. Refer to Publish To - Notes.
- For ticket workflow rules, you may also select the Append to Resolution check box to add the note to the ticket resolution
NOTE This feature is not available for Device or Quote workflow rules.
IMPORTANT Workflow rules are not applied retroactively. They will only fire on entities that are created or edited after the rule is in place. To force workflow rules to evaluate existing tickets, select Forward/Modify and then save without making any changes.


