Generating a manual notification
PERMISSIONS All users can create and send a manual notification email on the entities to which they have access.
NAVIGATION Navigate to the Notification section, tab, or panel of the parent entity or workflow rule.
BEFORE YOU BEGIN For an introduction to notifications, review the following topic: Notification emails.
NOTE If you see the Notification panel, refer to Notification panel.
To initiate the sending of a notification email, do the following:
- Navigate to the Notification section or Notification tab of the parent entity or workflow rule.

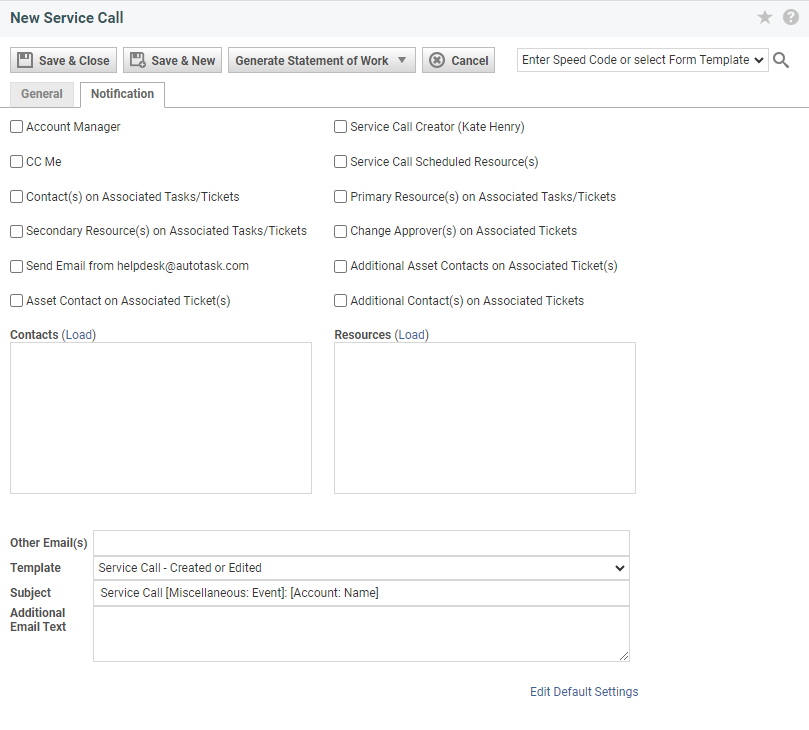
- Complete the following fields. Note that not all selections or fields are available on all pages.
| Field | Description |
|---|---|
| All Notifications | |
| Check All Options / Select All (not available on all pages) |
Click to check all role-based recipients. |
| Role-based Recipients | Select the check box in front of role-based recipients (example: Account Manager, Primary Resource) that you want to send the notification email to. For a comprehensive list and definitions of role-based recipients, refer to Role-based notification recipients. TIP If you have more than one Secondary Resource, you can hover over the line to see the list of secondary resources who would receive the notification. |
| Resources | Click Load above the Resources field to notify resources and workgroups not included with role-based recipients. On some forms, click into the selector field and start typing, or open the selector window. |
| Contacts (Not available on CRM notes and to-dos. Also, Contacts will not load for notifications that apply to multiple entities, for example, when forwarding multiple tickets) |
Click Load to select any customer contacts to notify. If the organization is a sub-organization of another organization, you can select a contact from the list of parent organization contacts that appear after the sub-organization contacts. NOTE If a customer contact does not appear on the list, open the Contact page and click Edit. Select the Notification check box to allow task and ticket email notifications to be sent to the contact. |
| Other Email(s) | To send this notification to recipients not available within Autotask, enter the email addresses here. Separate multiple addresses with a comma. |
| Select all Ticket Contributors (Tickets only) | Click to load the Resources field with the list of resources that contributed to the ticket. You can clear individual resources from the list if needed. If you hover over this option, it displays a list of all included resources by role. |
| Recall Previous Selections (Tickets only) | Click to load the Resources field with the list of resources previously selected when editing a ticket. |
| Notification Template | Click the drop-down menu and select a notification template. All active notification templates for the entity are available. For forms that allow you to save default notification settings (tickets and related forms), the default template for the entity is preselected but can be modified. |
| Use event's default notification template...(workflow rules only) | When you create a notification for a workflow rule, it is possible to select a different notification template than the default template for the event. Select this check box to use the event's default notification template if there is a corresponding notification template event. Leave it cleared to always use the notification template selected on the workflow rule. |
| Send email from <your company's group email box> |
By default, the initiating user will appear as the sender of the notification email. Select this check box if you want to send the email with your company's group mailbox as the sender. If this box is selected, any replies will come back to the group mailbox. Refer to Selecting a notification sender. |
| Subject, Email Subject | Type a subject for the email. Most templates will automatically populate the Subject field, but it can be overwritten. |
| Additional Email Text (manual notifications only) |
This field appears in entities that support email notification when you create or edit them. It stores additional text you want to appear in the notification email. Enter any text that you want to appear in the notification email above the attachment or above the body text defaulted in from the template. Depending on the entity, text that you enter here may or may not save to Autotask. If saved, it will be available for viewing as a system note. |
| To: Cc: Bcc: |
Unlike the notification panel, most pages that use a notification tab or section only allow you to CC: Me. On the New Project and the Reports > LiveReports Designer > Schedule Report page, you can additionally select CC and BCC recipients for your notification emails.
Projects and tasks also include the role-based recipients described in the following row. |
| To: Me, Team Members, Project Lead Projects only |
Click on one of these role-based recipient options to add the described resources to the recipient list without opening the Resource Selector. |
| Edit Default Settings | Ticket and task-related forms allow you to save and edit default notification settings for an entity. These settings are specific to your user account and can be managed on the Default Notifications page. Refer to Configuring default notification settings. |

- Click Save, Save & Close, or Save and New.
If you created the notification manually (including notifications that are based on a default setting or a form template), the notification will be sent immediately.
If the notification was created on a workflow rule, the notification email is sent automatically every time the workflow rule fires.


