Configuring default notification settings
PERMISSIONS All users with Add or Edit access to the parent entity that supports default settings
NAVIGATION Click Edit Default Settings in the notification section or the notification panel of the parent entity.
Where can you configure default notification settings?
Each time you send a manual email notification, you will need to select the email recipients. It is difficult to consistently pick the appropriate recipients. For this reason, we have added a feature that lets each Autotask user configure default settings to determine recipients of manual notifications in most situations. You can override the defaults when needed.
This feature is available on the New and Edit forms of the following pages:
- Attachment (Ticket, Task, and Project)
- Contract
- CRM Note (Organization, Contact, and Opportunity Note)
- Device
- Note (Device, Contract, Project, Task, and Ticket)
- Opportunity
- Send Statement of Work
- Service Call
- Task and Issue
- Ticket and Forward/Modify Ticket
- Ticket, Task, and Regular Time Entry
The Edit Default Settings link is located at the bottom of the Notification section or tab.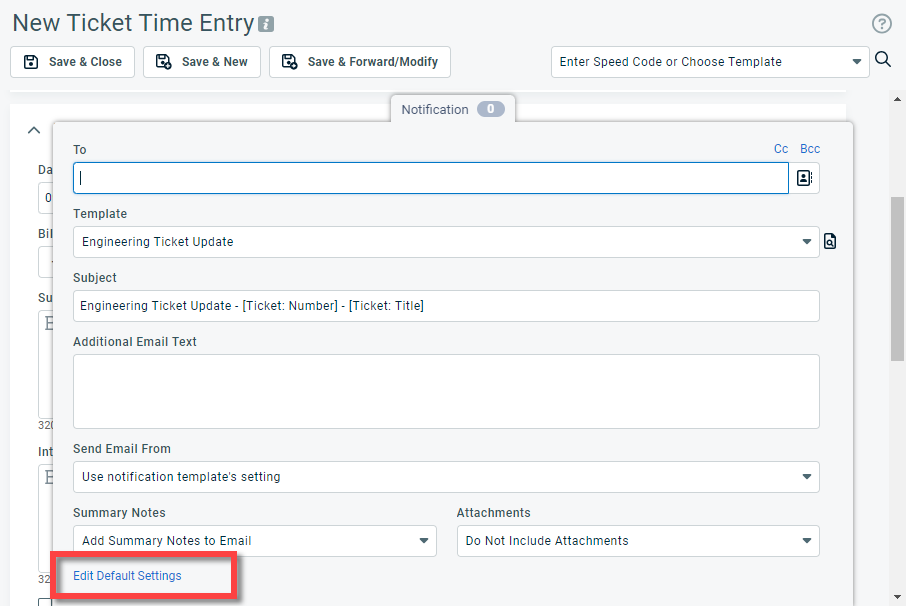
NOTE You cannot configure default recipients for quick notes and quick time entries on Activity tabs, but an administrator can select the notification template that will be used when they are sent. Refer to Selecting a default notification template for quick notes and quick time entries.
IMPORTANT If you click Reset User Settings on your Profile page, these settings will be deleted.
Configuring default notification settings
To configure default notification settings for a form, do the following:
- To open the page, use the path(s) in the Security and navigation section above.
- Scroll to the bottom of the Notification section, panel, or tab, and click Edit Default Settings. The Default Notification Settings dialog box will open.
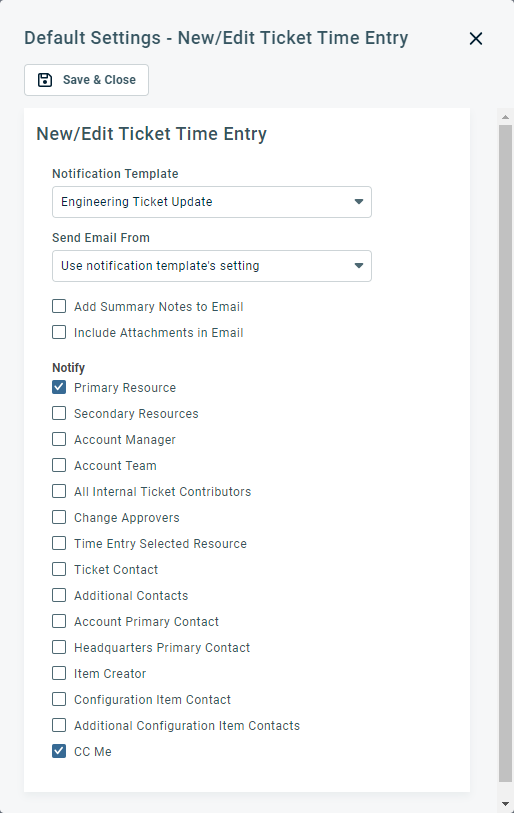
- Complete the fields as described below:
| Field | Description | |||||||||||||||||||||||||||||||||||||||||||||||||
|---|---|---|---|---|---|---|---|---|---|---|---|---|---|---|---|---|---|---|---|---|---|---|---|---|---|---|---|---|---|---|---|---|---|---|---|---|---|---|---|---|---|---|---|---|---|---|---|---|---|---|
| Notification Template |
Notification templates determine the content and layout of the notification email. Most templates contain not only the subject line and email body text, but variables that pull data right out of Autotask. NOTE If the list of recipients includes resources who lack permission to view internal notes, attachments, etc., the text pulled by the variable is replaced with See [Entity Name]. This field appears in entities that support email notification when you create or edit them. The default template is selected, but can be modified. All active notification templates for the entity and event are available. If it is present, click the preview icon |
|||||||||||||||||||||||||||||||||||||||||||||||||
| Send Email From |
This field determines the email address that is used as the Sender address in the notification email. Choose the email address you would like to use as the outgoing sender. Depending on the context, the following options are available: IMPORTANT Replies to notification emails will come to the selected email address. Make sure that the mailboxes are watched or the emails are properly redirected.
|
|||||||||||||||||||||||||||||||||||||||||||||||||
| Notify |
This header or section appears everywhere a notification email can be sent from Autotask, as well as the Default Settings dialog box for entities that support them. It is followed by a checklist of role-based recipients that can be selected to receive the email. In the actual email, the contacts or resources in these roles will replace the role names. Refer to Role-based notification recipients. On the entities (but not on the default settings), you can add named contacts and resources to the list of recipients and add external email addresses to the Other Email(s) fields. Customer contacts are added to the email To: field, whereas internal resources are added to the BCC: field. For the notification email to be sent, you must select or enter at least one recipient in the To:, CC:, BCC:, or Other Email(s) fields. |
|||||||||||||||||||||||||||||||||||||||||||||||||
|
Contract, project, and task notes only |
||||||||||||||||||||||||||||||||||||||||||||||||||
|
Add Note Description to Email |
Select to include the contents of the new or edited note's description field in the notification. |
|||||||||||||||||||||||||||||||||||||||||||||||||
|
Include Attachments in Email |
If attachments are added to the note, select this box to include those attachments in the notification. |
|||||||||||||||||||||||||||||||||||||||||||||||||
|
Ticket time entries and ticket notes only |
||||||||||||||||||||||||||||||||||||||||||||||||||
|
Add Summary Notes to Email (time entries only) |
Select to include the contents of the Summary Notes field in the notification. |
|||||||||||||||||||||||||||||||||||||||||||||||||
|
Add Note Description to Email (notes only) |
Select to include the contents of the Note Description field in the notification. |
|||||||||||||||||||||||||||||||||||||||||||||||||
| Include Attachments in Email | If attachments are added to the note or time entry, select this box to add those attachments to the notification email. | |||||||||||||||||||||||||||||||||||||||||||||||||
- Click Save & Close.
NOTE When you save, the page will close and return you to the location from which you opened the dialog box. The default notification settings will take effect the next time you open that event page.


