PERMISSIONS Security level with Admin permissions for Knowledge Base & Documentation. Refer to Admin security settings.
NAVIGATION Left Navigation Menu > Admin > Admin Categories > Automation > Knowledge Base & Documentation > Knowledge Base > General tab
IMPORTANT If you are importing data into a Full Language Support Autotask instance (check in Help > About Autotask), imported files will have to be saved differently. Refer to Multi-byte character support.
Many Autotask customers maintain documented solutions to common problems in an external knowledge base such as Sharepoint. While you can now create article references to external content, you can also import existing articles from a .CSV file into your Autotask knowledge base.
NOTE This feature is available for knowledge base articles, but not for documents. For an explanation of the difference between articles and documents, refer to About Knowledge Base articles.
The CSV import file can have up to three data columns. The columns must display the following headings:
- Article Title (required)
- Article Details (required)
- Category (optional)
The import template is available for download in two places, on the Import Articles page described below and the Autotask Downloads page. For more information on the Downloads page, refer to Autotask downloads.
NOTE Imported CSV files do not support article formatting. Articles longer than one paragraph may need to be edited and formatted after importing into the knowledge base.
To import knowledge base articles, do the following:
- To open the page, use the path(s) in the Security and navigation section above..
- Click the Import icon
 to open the Import Articles page.
- To download the import template, either click Download import template on the Import Articles page and then open or save the file, or navigate to Left Navigation Menu > Admin > Admin Categories > Features & Settings > Application-Wide (Shared) Features > Downloads and select the download arrow for the Article import template.
- Copy the article titles and article details, and optionally the categories of your articles into the template. If you want to import categories and subcategories, separate the subcategories with a > character. Do not use spaces around the character.
- Save the file in CSV format. Other file formats are not supported.
TIP There is no duplicate-checking during the import. Delete any duplicates from the .CSV file before running the import.
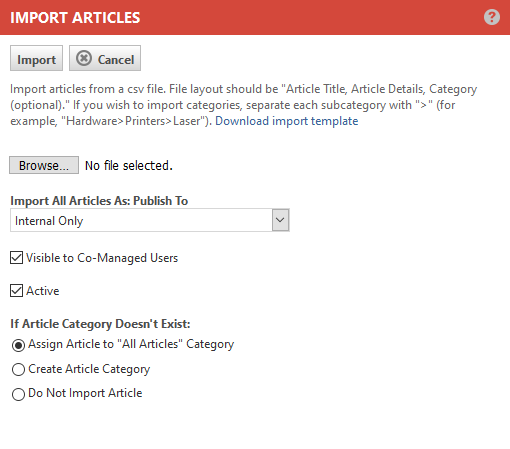
- On the Import Articles page, click Browse (or Choose File) and locate your file.
NOTE The file must be no larger than 5 MB. If it is larger than 5 MB, you will receive the error message, "Import file exceeds maximum file size (5 MB)."
- Select options from the following fields:
| Import All Articles As: Publish To |
Select a publishing option to determine who can view the knowledge base article. Choose from the following options:
NOTE If you publish content to an organization that gets merged with another, or a territory that gets deleted, the Publish To status will automatically default to Internal Only. NOTE The notification panel will only show external contacts if the Publish To setting is Internal & Organization. For all other Publish To selections, external contacts will not be listed. |
| Visible to Co-managing Users | By default , new articles and documents are visible to co-managing users. To hide the article or document from this group, clear the check box. |
| Active | The default status is Active. |
| If Article Category Doesn't Exist: | Select an option to determine how to handle imported articles when the specified category does not exist in the knowledge base. There are three options:
If the category in the CSV file is more than 4 levels deep, including the All Articles category, you will receive the error message, Categories/subcategories cannot be nested more than 4 levels deep (including the "All Articles" category) for that article. NOTE When creating categories during the import, Knowledge Base does not support the following special characters <, >, and &. You can include an ampersand when manually creating categories.
|
- Click Import in the top of the window to start the import.
When the import is complete, a message indicates the number of successful and failed article imports. When you click OK to acknowledge the message, a log file will open and indicate which articles failed and why.


