Importing or updating data
Overview
Autotask provides data import utilities for various entities that allow new and existing customers to bulk import legacy data.
Datto Consulting can import additional legacy information including: file attachments to customer records, and opportunities (forecasted sales). For more information, contact your Autotask Account Manager.
The following tables lists the entities that can be imported into your Autotask instance:
| Entities that can be imported | Detailed instructions for importing and updating | Can be updated using an export/import |
|---|---|---|
| Device and Subscription | Populating the Devices and Subscriptions import template | |
| Organization | Populating the Organization import template | |
| Organization and Contact | Importing organizations and contacts at the same time | |
| Organization Location | Populating the Organization Location import template | |
| Contact | Populating the Contact import template | |
| CRM Note and To-Do | Populating the CRM Notes and To-Dos import template | |
| Inventory Products and Stocked Items | Populating the Inventory Item Import template | |
|
Knowledge Base articles |
|
|
| Opportunity | Populating the Opportunities import template | |
| Product | Populating the Products import template | |
| Project Phase and Task (imports only) | Populating the Project Phases and Tasks import template | |
| Resource | Populating the Resources import template | |
| Service | Populating the Services import template | |
| Tag | Populating the Tag Import template | |
| Ticket | Populating the Ticket import template | |
| Ticket Note and Time Entry | Populating the Ticket Note and Ticket Time Entry template |
Some entities can be exported in import format, edited, and re-imported. This process allows you to update records that are already in your Autotask instance. Refer to Can be updated using an export/import.
File preparation
Before you copy the data into the .CSV import template, you should first deal with the following common issues.
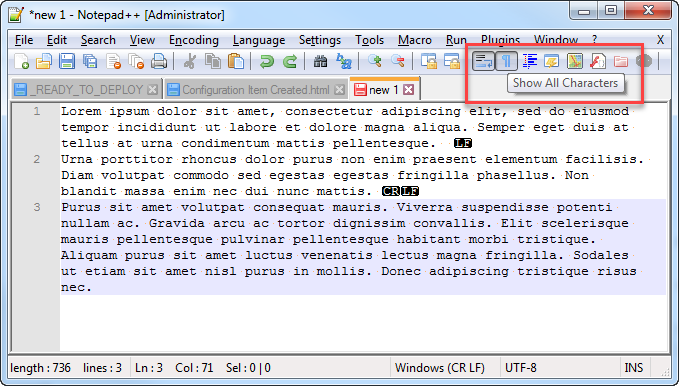
Import files can contain carriage returns or line feeds. They are hard to spot when you open the file in Excel. If you suspect your file contains carriage returns, do the following:
- Open the file in Notepad ++.
- On the toolbar, click Show All Characters. Also click the Wrap Text button to the left of it to make sure nothing is hidden.
Line feeds will be indicated by LF (white text on black background), Carriage Returns by CR LF.
- To quickly jump from one occurrence to the next, click the Find icon and search for "\r\n". Do not enter anything into the Replace with field.
- Step through the file and remove any unwanted line breaks.
- To remove line feeds only, search for "\n".
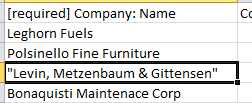
Depending on your language settings, CSV files treat commas or semicolons as delimiters, which means that everything after the comma is put into the next column, and all following columns are going to be imported into the wrong fields.
To prevent this from happening, strings that contain commas must be surrounded with quotation marks. If your language defaults to semicolon as the delimiter, do this for semicolon, instead.
TIP To automate this process, simply open the CSV file in a recent version of Excel, which conveniently puts quotes around any cell that contains a comma. This will prevent the comma from being misinterpreted as a delimiter.
NOTE If the downloaded template is displayed with all content in the first cell (not spread across columns), there is likely a mismatch between the list separators in Autotask and your Windows settings. This can happen when you are using English Autotask with a foreign-language version Windows. Language separator values can be changed for Windows via Control Panel > Region and Language > Additional Settings.
If you find that non-English characters are not imported correctly, try the following import process:
- Open a new workbook (File > New > Blank Workbook) in Excel.
- Select Data > Get External Data > From Text….
- On the Select Data Source page, select the desired .CSV file, and click Import.
- On the Text Import Wizard – Step 1 of 3 page, choose UTF-8 as the file origin, select Delimited, then click Next.
- On the Text Import Wizard – Step 2 of 3 page, select the check box next to Comma, then click Next.
- On the Text Import Wizard – Step 3 of 3 page, select Finish.
If you are importing data into a Full Language Support Autotask instance, imported files must be saved differently. Full Language Support will be indicated in the Help > About Autotask pop-up window. Refer to Multi-byte character support.
The .CSV import file cannot be larger than 5 MB. Large data files must be broken up.
For length restrictions on string fields, refer to String Fields Length.
Populating the CSV import template and importing the file
-
Download the .CSV template from Left Navigation Menu > Admin > Admin Categories > Features & Settings > Application-Wide (Shared) Features > Downloads or from the Import page of the appropriate entity. Refer to the paths in the specific import instructions in the Overview.
IMPORTANT If you open the import template using Google Sheets, it changes the encoding from UTF-8 to ANSI. This will result in errors when you attempt to import the file into a German or Spanish Autotask instance. You must either open the file in Microsoft Excel (where this is not an issue), or open the file in Notepad++ to convert the encoding to ANSI so it will import without issue.
-
Open the .CSV file with the source data.
-
Column by column, paste the source data into the import template.
IMPORTANT Do not:
• Alter the file type to something other than .CSV
• Rename column headers
• Delete required columns. You may delete any of the other columns and the import will still work, but that will shift the contents of the Exceptions file and complicate re-importing the exceptions.
• Add columns. If you need additional columns, add them as User-Defined Fields in Autotask, and then download the template again. Refer to Managing user-defined fields.
- Some fields must be populated with values that already exist in your Autotask instance. This is indicated in the Must be looked up in Autotask instance? column in the import instructions. If you try to import a different value, the import will fail.
- Make sure all required fields are populated in all rows.
NOTE Entering [[empty]] into non-required fields will remove any information stored in that field and replace it with a null value. Values that must be looked up in your Autotask instance cannot be cleared using this method.
- Navigate to the appropriate Import page for the entity you are importing into. For specific paths for each entity, refer to the linked help pages in the table above under Detailed instructions for importing and updating.
- On the Import page, click Import.
To import project phases and tasks, in the Projects module, search for and open the destination project. In the Project Menu, click Schedule. On the Schedule page, click Actions > Import from: .CSV File.
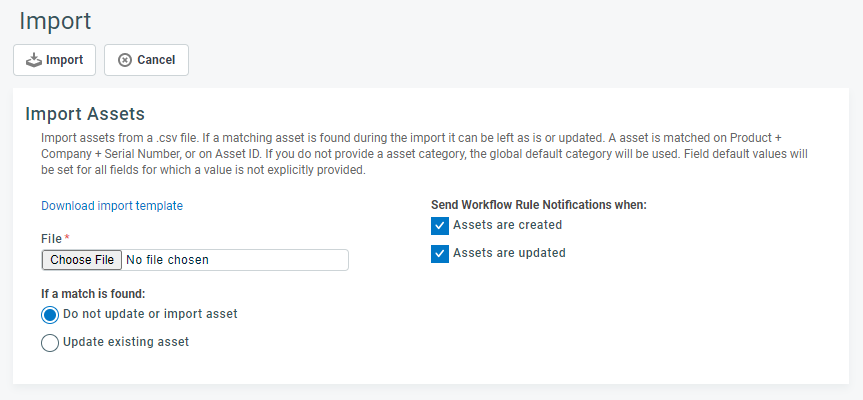
The Import page opens:
- Click Browse or Choose File to locate the prepared .CSV file, then click Open. The file path is copied into the File field.
- Use the If a match is found radio buttons to select your import/update settings.
Duplicate criteria for imports
When the following fields match exactly, the import tool will consider it a duplicate:
Template Duplicate Check Criteria Organizations and Contacts Organization: Name + Phone Number, or Organization ID
Contact: Organization + Organization Phone + First Name + Last Name + Email, or Contact IDOrganization Locations Organization or Organization ID + Location Name CRM Notes & To-Dos Organization + Action Type + Assigned To + Start Date/Time + End Date/Time Devices Organization Name + Product Name + Serial Number, or Device ID Opportunities Organization Name + Opportunity Name Products Product Name + Category + Period, or Product ID Inventory Products Inventory Products: Product + Location
Stocked Items: Product + Location + Date Added
Serialized Stocked Items: Product + Location + Date Added + Serial Number
Phases and Tasks There is no duplicate checking for phases and tasks. These items can only be imported, not updated. All phases and tasks that appear in your import file will be added. Services Name or Service ID (for Services that were exported). If the Service ID is a duplicate, the record is considered a duplicate even if the name is unique. Tags and Tag Groups
Label or Alias. If an imported tag’s label matches any existing tag labels or aliases, or if any of an imported tag’s aliases match any existing tag labels or aliases, it will be considered a match. The label must be 50 characters or less, and cannot contain the | character. When a match is found, the new tag will not be imported and the existing tag will not be updated. Separate each entry with the | character.
Tickets Ticket Number Ticket Time Entries Ticket Number + Resource + Start Date/Time + End Date/Time Ticket Notes Ticket Number + Created By Resource (or Contact) + Create Date/Time + Title Resources Username
- If you want to send (or not send) workflow rule notifications when items are created or updated using the import, select the appropriate check boxes under Send Workflow Rule Notifications when:. Note that if you leave the boxes cleared, the workflow rule will still fire, and updates and all other actions (besides notifications) will still occur. The system note on the ticket will say: "Notification e-mail suppressed by data importer." This option is available for the creation and update of tickets, opportunities, and devices. It is available for the creation of ticket time entries, ticket notes, and project phases and tasks.
- When you are importing services, you can optionally update vendor or unit cost for posted and/or non-posted services as of an effective date. This changes the costs and the profitability calculations for existing contracts.
- Click Import. A dialog box will let you know that you will be notified via email when your import has finished.
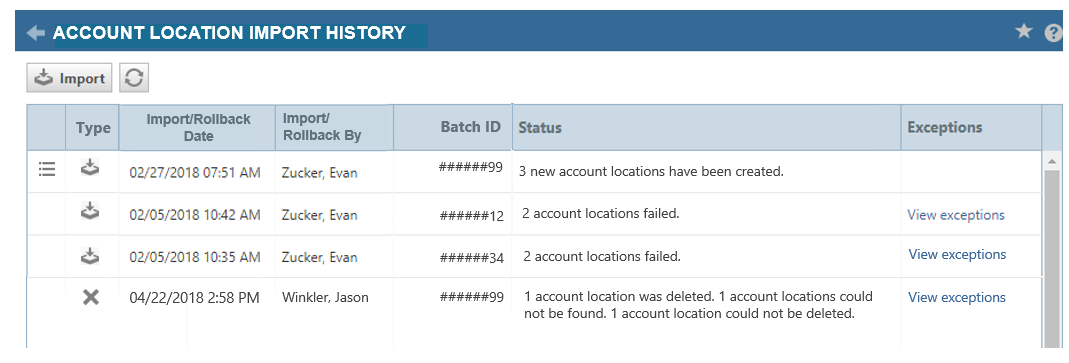
When you close the dialog, the Import History page will be displayed. The import record shows the status of your import.
- If some records failed to be imported, you can click the View exceptions link in the Exceptions column. This will open a .CSV file that contains all records that failed to import, with the first column displaying the reason for failure.
- Address all issues, delete the Reason for Failure column and save the Exceptions file.
- Follow steps 1 - 4 to import the Exceptions file.
Rolling back an import
New records created by an import can be deleted by users with permission to delete this entity type. However, you cannot roll back any updates to information made during an import.
To delete an import batch:
- Go to the Import History page for the entity type.
- Find the import batch you would like to delete.
All imports are identified by a unique Batch ID. You roll back the entire batch records. - Right-click the import you want to roll back and select Delete [Items] created by this Import Batch. A dialog window will let you know that the deletion is being processed.
- Click OK.
- Once the deletion is complete, a row will appear on the table showing a Delete icon
 in the Type column. The Batch ID column shows the same batch ID as the import row that was rolled back.
- You may not be able to delete all imported records. If a record cannot be found, it has already been deleted. If a record cannot be deleted, it has been associated with another data record in Autotask.


