Configuring the Sales Process checklist
PERMISSIONS Security level with Admin permission to configure Sales & Opportunities. Refer to Admin security settings.
NAVIGATION Left Navigation Menu > Admin > Admin Categories > Features & Settings > Sales & Opportunities > Sales Process
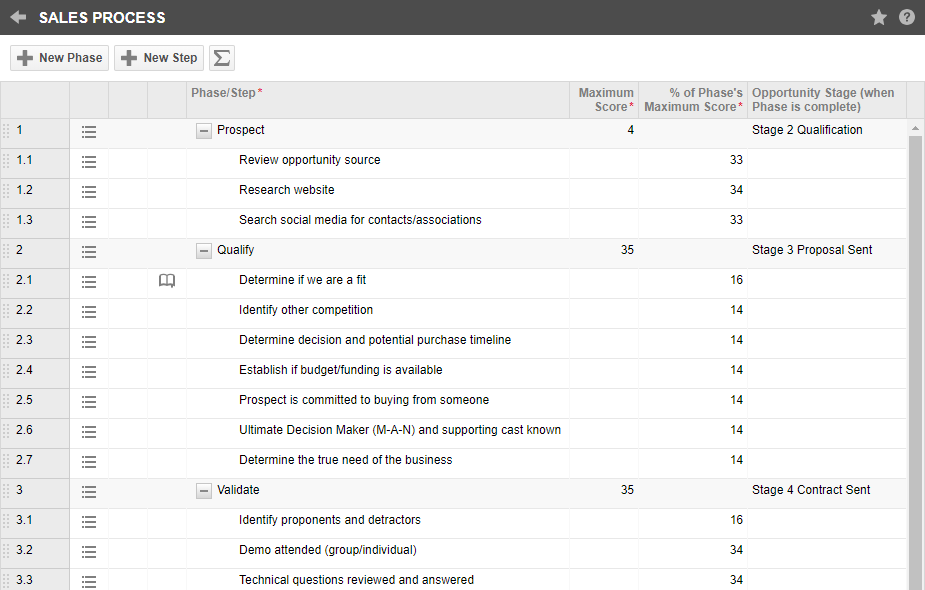
When Opportunity Assessment is enabled, a default Sales Process checklist becomes available that will guide your salespeople through your company's sales process.
Managing phases and steps
To open the page, use the path(s) in the Security and navigation section above.
| Column | Description |
|---|---|
| Row ID | Each Phase or Step on the table has an ID number. The ID numbers use decimal places to indicate each item's position on the table. Integers indicate a group row, decimal numbers a question row. When you move (drag & drop) a Phase or Step, the item's ID number updates to reflect the new position on the table. |
Warning Icon  F F |
The warning icon is displayed when the sum of % of Phase's Maximum Score values for all Steps in this Phase is less than 100%. |
| Book Icon |
If the Step has an associated Knowledge Base article, a book icon will appear in this column. Refer to Associate a knowledge base article with a step. |
| Context Menu: Edit | Clicking the Edit option will put the Phase or Step row into Edit mode. |
| Context Menu: Associate/Disassociate Knowledge Base Article | You can associate a Knowledge Base Article with each step. The first 100 characters of the Knowledge Base article will be appended to the Step name. When a Knowledge Base article is already associated with the step, the context menu option will be Disassociate Knowledge Base article. Refer to Associate a knowledge base article with a step. |
| Context Menu: Delete | Both phases and steps can be deleted by clicking OK on the confirmation window. Deleting the phase means that all steps in the phase will also be deleted. Existing Sales Process scores will not be recalculated for individual opportunities until you perform a Save on the Opportunity page's Sales Process tab. The Total Sales Process row cannot be deleted. |
| Phase/Step | The Phase/Step displays the name of the phase or step. Phase names are shown in bold, and show a Collapse icon. |
| Maximum Score | The Maximum score must be an integer between 1 and 999. |
| % of Phase's Maximum Score | Blank for the Total Sales process and the Phase rows. Step rows show the % of the Maximum Phase score that step is worth. |
| Opportunity Stage (when Phase is complete) | You can specify an Opportunity Stage for each phase. Once the phase has been marked as Complete, the Opportunity Stage will automatically be advanced to this Stage. |
How to...
Phases serve to organize the Sales Process steps. You can create up to 15 phases for the Sales Process.
- Click New Phase. If a row is selected, a new row is inserted below the selected row. If no row is selected, a row is inserted below the last row.
- To edit a row, click the context menu and select Edit. The row is put into Edit mode.
- Enter a name for the Phase.
- Enter a Maximum Score. The Maximum Score must be an integer between 1 and 999, and the number should reflect the relative importance of the phase for the Total Sales Process score.
- Optionally, specify the Opportunity Stage the completed phase will correspond to. Once the Phase has been marked as Complete, the Opportunity Stage will automatically be advanced to this Stage.
- Save or Cancel your changes.
You can create up to 15 steps in each phase.
To create or edit a Sales Process step:
- Click a phase ID.
- Click New Step or select a step and click Edit on the context menu. The row is put into Edit mode.
- Enter a step.
- Enter the % of Phase's Maximum Score this step is worth. The % of Phase's Maximum Score must be an integer between 1 and 100. The sum of all % of Phase's Maximum Scores must be less than or equal to 100. When you create a new step, this value will default to 100 minus the sum of % of Max Phase Score for all other steps in that phase.
- Save or Cancel.
Optionally, each step on the Sales Process checklist can be associated with a knowledge base article that provides additional information to the salesperson. The step must be saved before the article can be associated.
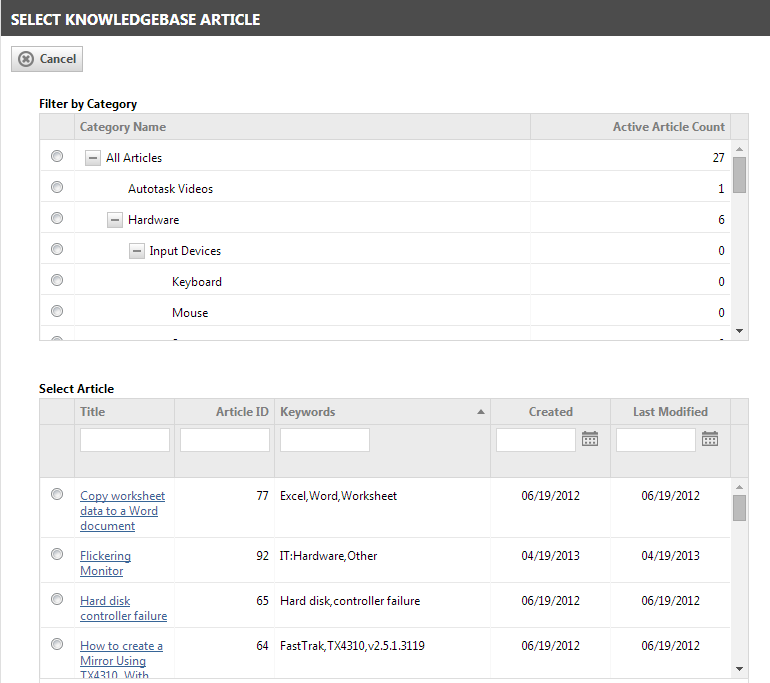
- Click the context menu and select Associate Knowledge Base Article. A window will open.
- In the Filter by Category pane, select the category and sub-category that contains the article you are looking for. The list of active articles contained in the category will be displayed in the Select Article pane.
- Scroll to the article you would like to associate.
- Click a radio button to select an article. The window will close automatically, and a book icon will indicate that the step is now associated with a Knowledge Base article.
- To disassociate a Knowledge Base article, click the context menu and select Disassociate Knowledge Base Article.


