Setting report output options
PERMISSIONS Users with security levels that allow the creation of LiveReports. Any security level in Autotask can be configured with this permission. Refer to Configure access to LiveReports Designer.
PERMISSIONS Access to the report folder that contains the report
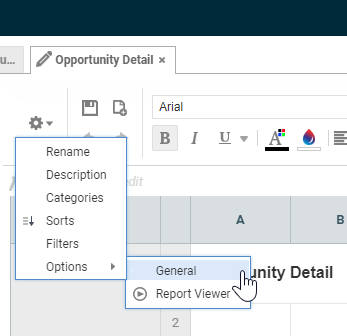
NAVIGATION Left Navigation Menu > Reports > LiveReport Designer > Edit report > Report Options menu > Options
NOTE For Express Reports, report options are set on the Options tab. Refer to Options tab.
As a report creator, you can separately configure options that determine how reports are generated, and report viewer options that determine interactive report features in the HTML output format after the report has been generated.
About general report options
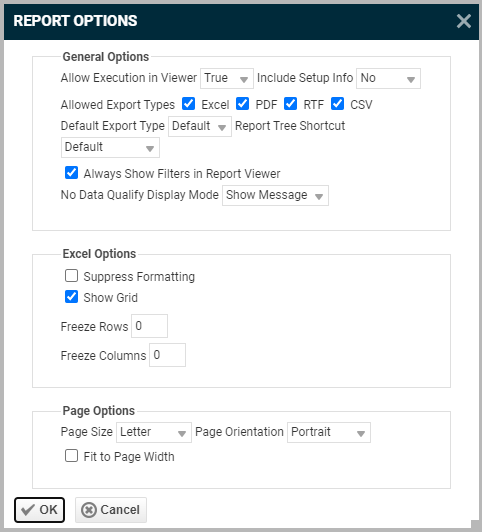
The settings on the Report Options window determine if the report can be run in HTML format (in the Viewer), what the default and the allowed export settings are, and other settings that determine the look and feel of the generated report.
TIP The report may display differently in different output options, especially if it is complex or contains a large number of columns. For example, PDF output will attempt to re-size the report to fit on the specified page size. We suggest you run a test copy of the report and, if needed, adjust the formatting, for example, change the type size or allow text to wrap. Refer to Formatting and editing LiveReports.
About Report Viewer options
After running a report in the Report Viewer, you can make further modifications. Interactive options include the ability to apply format changes, re-size and hide columns, change the column sort, and apply filters to the generated report. These changes can be exported to other formats, discarded, or saved as a separate copy of the report depending on the settings.
Some of these options are available in all HTML reports including Express Reports without needing to be enabled. Some are configured in the Report Viewer Options window.
How to...
- To open the page, use the path(s) in the Security and navigation section above.
- Select a report and click the Edit Selected Report icon. The report opens in Edit mode.
- Navigate to Report Options > Options > General.
The Report Options dialog is displayed.
- Make selections from the following:
| Name | Description |
|---|---|
| General Options | |
| Allow Execution in Viewer | Defaults to True. If you select False, the report cannot be viewed in the HTML Report Viewer; it can only be exported in one of the Allowed Export Types. |
| Include Setup Info | Specifies whether the setup information is displayed when running the report, including Data Categories, sorts and filters. The setup information displays on its own page. The setup menu options include: • No: Select this option if you do not want the setup information displayed on the report. This is the default. • Top: Select this option if you want the setup information to display at the top of the report. • Bottom: Select this option if you want the setup information to display at the bottom of the report. |
| Allowed Export Types | Specify which export types are available. When a format check box is not selected, that format is not available when running the report. If you disable all export types, the Export icon will be removed. NOTE If you clear Excel (the global default), but leave Default as the Default Export Type, the report will be generated using the next available Allowed Export Type (PDF, RTF or CSV, in that order). |
| Default Export Type | Sets the default output type for your report. The following options are available: • Default - The global default export type for LiveReports is Excel • EXCEL • RTF • CSV The report default you select here will override the global default, as long as it is checked as an Allowed Export Type. |
| Always Show Filters in Report Viewer | Select Always Show Filters in Report Viewer to show the filter menu and allow changes to be made each time the report is run. This will display the filter menu even if no existing report filter is set to Prompt for value. For more information on filters, see the Filters tab of the LiveReports Designer. |
| No Data Qualify Display Mode | Decide if you want to show a message or display an empty report if no data is returned. |
| Excel Options | |
| Suppress Formatting | Select to prevent the report formatting (options selected from the toolbar, such as bold, wrap, etc.) from being exported to Excel. TIP Enabling Suppress Formatting greatly reduces the amount of time it takes for a report to generate. |
| Show Table | Select to show the table. |
| Freeze Rows Freeze Columns |
Enter a number of rows or columns to be frozen in the report when it is exported in Excel. This is useful to allow row or column headers to be continually displayed as users scroll through the report data. |
| Page Options | |
| Page Size | Sets the page size for the report. Page sizes include common North American and European page sizes. |
| Page Orientation | Sets the orientation for the report. Options include either Portrait or Landscape with the default of Portrait. |
| Fit to Page Width | Scales all columns to fit the width of the page. NOTE The width of each column depends on the dimensions and orientation of the page. Only applies for HTML if you checked Simulate PDF. |
- Click OK.
This window allows you to control what interactive capabilities a user has after the report has been generated in HTML format.
- Open LiveReport Designer and edit a report.
- Click the Report Options menu icon and select Options > Report Viewer.
- Make changes to the settings on all tabs.
- Click OK to save the settings.
Clear or select the check boxes as described.
On this tab, you can set up simple interactive filters on data fields in the report. The user can apply these filters to the HTML report output after the report is generated. This allows you to create one report and publish it to the entire sales team, and each user the report is published to can then apply the pre-configured filters that show them data relevant to them.
EXAMPLE If the HTML output for a sales report has interactive filters available for the Territory and Active Opportunity Amount data fields, the user can filter the output for the desired data, without re-running the report.
- On the Report Viewer Options page, select the Filters tab.
- In the Data Field column, locate the field(s) you want to make available as filters. Drag a field to the Filter pane, or double click the field, or click the field and select Add.
- Complete the remaining fields.
| Name | Description |
|---|---|
| Title | Defaults to the data field name. You can edit the name. |
Type |
Choose a filter type: Single Choice - Select one item from a menu of possible filter values Multiple Choice - Select check boxes for any number of items from the list of possible filter values Range Slider - Use slides to select a range between two values. This is often used for dates Single Slider - Slide a bar to select a point along the scale |
| Sort Direction | Select the preferred sort direction for the column that contains the filtered value. |
| Filter Value Format | Click to open the format menu and specify how the filter values should be displayed for General, Text, Date and Number fields. |
| Initially Display Filter on Panel | Select this box to display the filter on the interactive panel dock of the report viewer. Refer to Apply filters in the report viewer. |
| Value | This field or fields appear when you select Initially Display Filter on Panel. It allows you to specify filter values which are automatically applied when the report is executed. TIP We recommend that you leave these fields empty so the person executing the report can filter the report as needed. |
If you want the user to be able to change the sort direction of columns in the Report Viewer, keep the check box "Display Sorts in Report Viewer" selected. Enter a title for each column. In the Report Viewer, the title will display instead of the field name.
In the Report Viewer, the list of columns appears in the HTML dock. You can select the sort direction for each column. Refer to Change sorts.


