The Task page
PERMISSIONS Permission to view projects. Refer to Project security settings.
NAVIGATION Left Navigation Menu > Projects > Search > Projects > click Search > context menu > View Project > Schedule > task context menu > View Details
NAVIGATION My > Tasks & Tickets > context menu > View > Task
The Task page displays all critical information related to the task, along with information about the project and related entities, and related items like notes and time entries. The task may also include a checklist of the steps required to complete the task and a timeline to indicate progress on the task and where the task fits into the greater project.
To open the page, use the path(s) in the Security and navigation section above. Depending on your user profile and browser settings, tasks open in the main workspace or on a new tab.
TIP When browser window size allows the standard layout, but you don't need to see the insights panel, you can click the toggle icon ![]() on the page header to display the compact layout.
on the page header to display the compact layout.
For information on the general page layout and common elements on all entity pages, refer to Entity Page Layout.
Refer to Page header.
A button row provides access to a number of task management features.
| Action | Description |
|---|---|
| Edit | Click to put the task into Edit mode so you can make changes to the task fields. The stopwatch will continue to run. Refer to Adding or editing a task. |
| Tools | Refer to Tools Menu. |
| Cancel / Restore Task (Restore is available for canceled tasks.) |
Click to cancel the task. Estimated Hours field is set to 0 and Status is set to Complete. In the project schedule, the task appears grayed out and disabled. For a canceled task, click Restore Task to enable the task in the project schedule. The Estimated Hours and previous (before cancellation) task Status are not restored. |
| Print View | Click to open a Task Print View formatted for printing.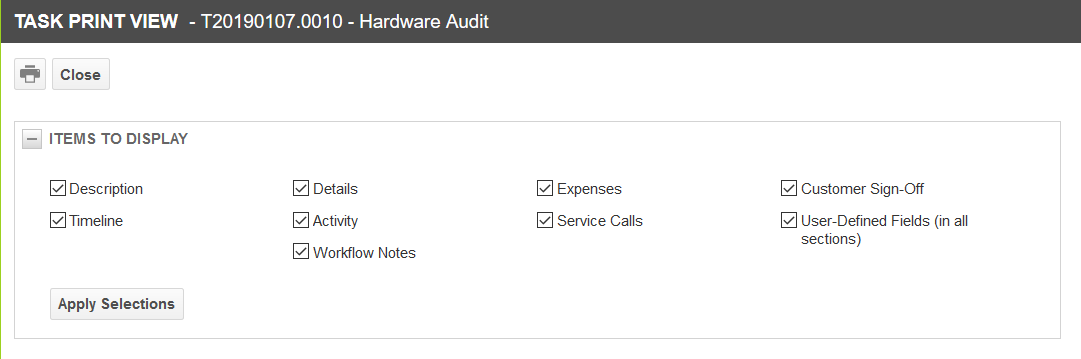 Select or clear check boxes to choose which information you want to print: Description, Timeline, Details, Activity, Workflow Notes, Expenses, Service Calls, Customer Sign-Off, User-Defined Fields. Click Apply Selections to view the updated print view. NOTE Customer Sign-Off provides a signature line for your customer to acknowledge and approve completed work. After you select the information you want to include, click thePrint icon on the print view to send the information to your printer. Also refer to Printing a ticket. |
| Option | Description |
|---|---|
| Add to New Service Call | Opens the Add Service Call page from which you can schedule a new service call for the task or add the task to an existing service call. Refer to Creating and managing service calls from a task or ticket. |
| Add to My Work List | Allows you to add the task to your Work List. Refer to Using work lists. |
| Add to Primary Resource's Work List | Allows you to add the task to the primary resource's Work List. Refer to Using work lists. |
| Add to Other Resource's Work List | Allows you to add the task to the Work List of one or more additional resources. This option opens a resource selector populated with all active resources. You can select one or more resources. Refer to Using work lists |
|
Send Survey to Task Contact |
You can select a survey to send to the task contact to find out how satisfied the customer is with your services. Refer to Selecting a survey to send to a task or ticket contact. |
| View History | Opens a dialog box that displays a list of all changes made to the task. Refer to The Task and Issue History pages. |
| Delete | Deletes the item. You cannot delete tasks with time entries. Deletion cannot be undone. |
Refer to Quick Add bar.
The ticket Details panel is located to the left of the Main panel. It contains a fixed header and additional sections that can be expanded and collapsed. Refer to The Details panel. For field descriptions of fields that can appear in Details panel sections, refer to Task fields, Details panel.
At the top of the Main panel area, the following information is displayed:
| Field | Description |
|---|---|
| Task Category | The Task Category controls almost everything about the task it is applied to. Refer to Introduction to Categories. |
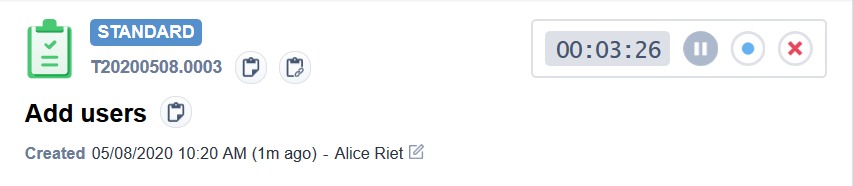
| Task Number | Each task is identified by a unique number which incorporates the date on which it was created and an automatically incremented number. Example: T20230719.0007 is the seventh task created on July 19, 2023. |
| Task Title | The summary of the request or issue tracked on the task. |
| Quick Copy Buttons |
There are four Quick Copy Buttons on the Task page:
|
| Task Stopwatch | The stopwatch is displayed in the upper right corner and tracks the elapsed time as the task is worked on. The clock always starts automatically when this page is opened and will continue to run even if you put the task into Edit mode. Refer to The task or ticket stopwatch. |
| Create Date and Task Creator | Create Date and Time and Task Creator are system fields automatically populated by Autotask. They cannot be modified. |
The middle part of the main panel is made up of up to three components:
- Description
- Timeline. Refer to The task timeline.
- Checklist. Refer to The checklist.
Each component can be collapsed or expanded, and this setting is remembered for each task category and user. The display order of the sections is determined by the task category. Refer to The General tab.
For comprehensive information about accessory tabs, refer to Accessory tabs.
The task accessory tabs are located at the bottom of the main panel area. The following accessory tabs are available:
For general information about insights, refer to The Insights panel. For information about task insights, refer to Task insights.


