Assigning the ticket to a service partner
PERMISSIONS Outsource permissions
NAVIGATION To open the page, use the path(s) in the Security and navigation section above. > Outsource > Other Partner or Recent Partner
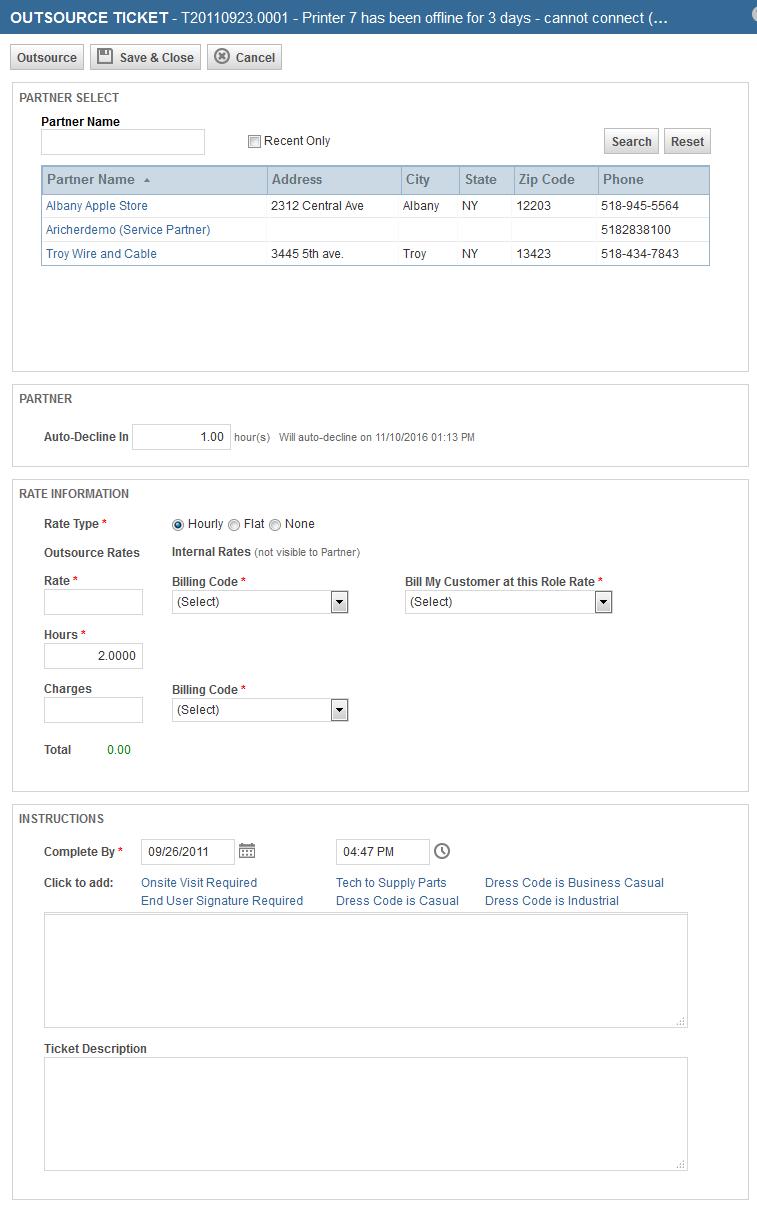
To outsource a ticket, you will select a partner and specify the outsourcing terms and internal billing information on the Outsource Ticket page.
How to...
- To open the page, use the path(s) in the Security and navigation section above.
- Click the Outsource drop-down list and select a partner (up to 10 are displayed), or click Other Partner to select one who is not displayed.
The Outsource Ticket page will open.
If you selected a recent partner from the Outsource menu on the Ticket page, that partner will already be selected on the Outsource Ticket page. If you selected Other Partner from the Outsource menu, the list of available partners and partner search features appear at the top of the page.
- Complete the following fields:
| Field | Description |
|---|---|
| Partner Select (if you clicked Other Partner...) | |
| Partner Name | You can filter the list by entering a partner name or the first characters of a partner name in the Partner Name field and clicking Search. |
| Recent Only | To limit the results to partners to which a ticket has recently been outsourced, select the Recent Only check box. |
| Partner (if you selected a partner from the Outsource menu) | |
| Change Partner | Allows you to select a different partner. Click to open the partner selection list in the Outsource Ticket page. Only active partners are displayed. |
| Partner Name link | Populated with the name of the partner selected for outsourcing. Click the name to view the partner's detail information. |
| Contact Name link | Populated with the name of the partner's primary outsource contact. Click the name to view the contact's detail information. |
| Auto-Decline In* (required) Defaults to one hour | Enter the amount of time allowed before the ticket is automatically declined. Sets the date and time before which the partner must accept or decline the ticket. If the partner does not act, the system automatically declines the ticket. Refer to What happens while the ticket is outsourced? |
| Rate Information | |
| Use Last Rate for this Partner | Only appears if you have previously outsourced a ticket to the selected partner. Populates the Rate Information fields with the information that was used the last time you outsourced a ticket to this service partner. You can edit individual fields if necessary. |
| Rate Type* (required) |
Select Hourly, Flat, or None. Default selection is Hourly.
• If you select Hourly, the Rate, Hours, Billing Code, and Bill My Customer at this Role Rate fields are required. • If you select Flat, the Rate, Billing Code, and Bill My Customer this Amount fields are required. • If you select None, the Rate, Hours, and Billing Code fields are disabled and Bill My Customer at this Role Rate is required. |
| Rate (required unless Rate Type = None) | Enter the billing rate: flat rate or per hour rate, as determined by the Rate Type field. |
| Billing Code* (required unless Rate Type = None) | The service partner's time entries will be rolled up into one Charge billing item on their invoice to you. Select the Material Code to associate with time entry items added to this ticket. The menu contains all currently available Material Codes. |
| Bill My Customer at this Role Rate Bill My Customer This Amount (if Rate Type = None, Bill My Customer at this Role Rate is required) These fields are not visible to the service partner. |
If rate type is Hourly, the field label is: Bill My Customer at this Role Rate. If rate type is Flat, the field label is Bill My Customer this Amount. Specify the amount that your customer will be billed. This information is automatically applied in the Autotask billing process. |
| Hours (required if Rate Type = Hourly) | When rate type is Hourly, enter the number of hours authorized for the service partner to complete the assignment. |
| Charges | Enter the amount that you authorize the service partner to spend on charges other than labor. |
| Billing Code (required if you enter a Charges amount) | Select the Material Code to associate with non-time entry charges added to this ticket. The menu contains all currently available billing codes. |
| Total |
Read only. Total indicates the total charges (time entry and other authorized charges) authorized for this ticket.
• Where rate type = Hourly, total = the hourly rate times the authorized hours, plus the authorized charges. • Where rate type = Flat, total = the flat rate plus the authorized charges. |
| Instructions | |
| Complete By* |
Specify the date and time by which the service partner must complete the assigned work. Default Date/Time is the complete by date/time specified for the ticket before outsourcing.
• Date: click icon to open date selector and select a date; alternately type date directly in the field or use up, down, left, and right arrows to adjust date. • Time: type new time; use up, down, left, and right arrows to adjust time, or click icon to open time selector. |
| Additional instruction shortcuts | Click a link to add that text to the Instructions field. |
| Instruction text field | Type any additional instructions directly in the field. You can use the shortcut links above to add standard instructions with one click. |
| Ticket Description and Product Name: | This text field displays the description from the original ticket and can be edited until the ticket is assigned. If a device is associated with the ticket, the first line of the description reads: Product Name: followed by the product name. |
- Do one of the following:
- Click Outsource to save the current settings, close this page, and send the ticket to the selected service partner.
- Click Save & Close to save the current settings and close this page. This option does not send the ticket to the service partner.
- Click Cancel to close the page without saving any changes or settings.
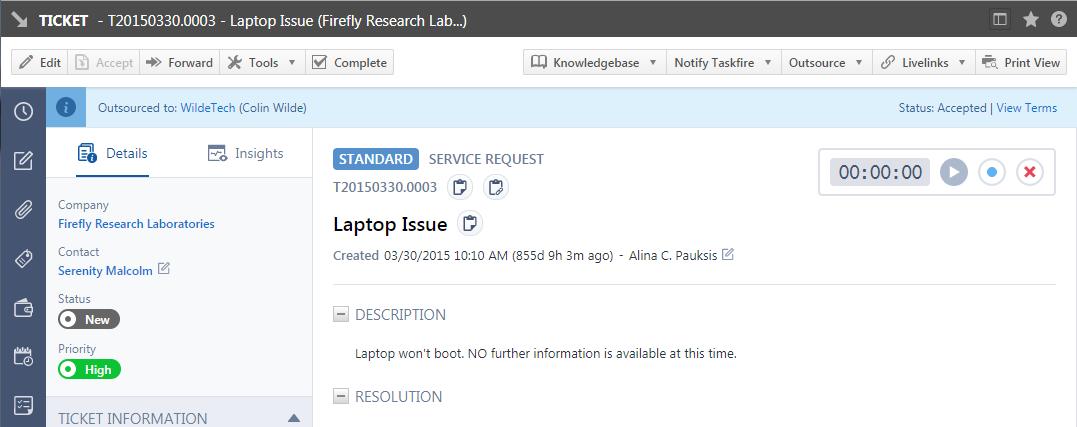
The Outsource Ticket page will close, and the orange outsource information bar will appear on the ticket detail page.
What happens...
- After a ticket is outsourced, outsource information appears at the top of the ticket detail
- The partner name appears in the Outsourced To column of Autotask ticket lists
TIP The Outsourced To column does not appear in ticket lists by default. You must select it from the column chooser.
- The service partner receives an email notification, a note is added to the ticket, and the ticket appears in both the service and lead partner Waiting Acceptance lists
- The service partner can accept or decline the ticket within the time specified in the outsourcing information
- Outsourcing information and terms can no longer be edited unless the ticket is declined
- The lead partner can cancel the ticket up to the time that the service partner accepts the ticket
NOTE Once a ticket has been accepted by a service partner it can never be deleted, even if no further activity occurs.
Service partners can decline tickets you outsource to them for any reason. If the service partner does not accept or decline the ticket within the auto-decline time specified in the outsource terms, the ticket is automatically declined.
- When declining the ticket, the service partner must provide a reason for declining
- The resource who outsourced the ticket is notified by email that the ticket has been declined. The decline reason appears in the notification.
- A read-only note is added to the ticket, visible to the lead partner
- The outsource status on the ticket detail becomes Declined
- The partner name is removed from the Outsourced To column in ticket list
- The ticket becomes available to outsource to another partner, and the outsourcing and billing terms are no longer read-only
- A new ticket that is linked to the lead partner's outsourced ticket is created in the service partner's Autotask instance. Refer to Accepting or declining tickets.
- The Outsource Status changes to Accepted
NOTE Once it has been accepted by a partner, an outsourced ticket can never be deleted.
- The resource that outsourced the ticket is notified by email that the service partner has accepted the ticket
- A read-only note is added to the ticket
- The new ticket is linked to and synched with your original ticket. Notes, attachments, and time and charge entries added by both you and the service partner are visible on both tickets. Refer to What happens while the ticket is outsourced?.


